
(image credits: IG lighthousehoya)
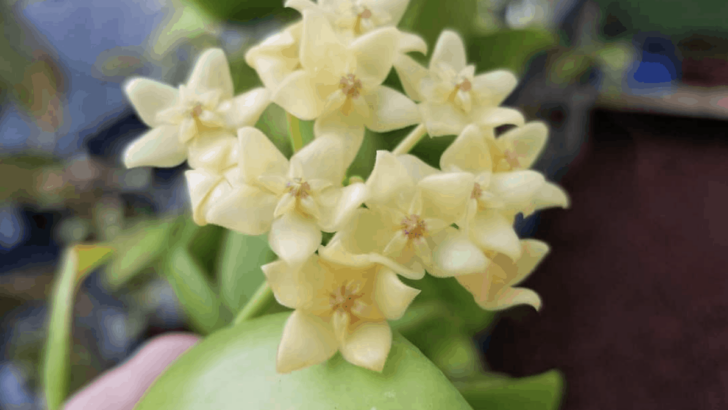
These beautiful Hoyas come from islands off Australia’s coast, and they will charm you with their buttery yellow flowers that grow in typical Hoya clusters.
Their leaves are thick, light green with no visible veining, and they grow in pairs, hence the name diptera. In Greek, di means two, and ptera means wing making it the double-winged Hoya.
These epiphytic vining plants can grow pretty big and pretty fast, so they will need a trellis or moss pole to hang onto.
Hoya Diptera care is relatively low maintenance if you can stick to a regular schedule and won’t give you much trouble if you provide them with a well-draining medium using potting soil, orchid bark, gravel and perlite to grow in and an environment with humidity around 70 to 80%.
Water regularly once a week on average and keep temperatures between 60°F (15°C ) and 95°F (35°C). Use an organic fertilizer during the growing and blooming season in Spring and Summer.
That is it in short, but if you want the nitty-gritty about the maintenance of a Hoya diptera, keep on reading as we have all of the tips and tricks you can employ to keep your Hoya healthy and thriving.
[toc]
Hoya Diptera Plant Care Guide
Soil
The perfect growing medium for your Hoya diptera will e a very well-draining one that is light, airy, and chunky.
Epiphytes feed on nutrients in the air, so the roots shouldn’t be suffocated with dense and overly heavy soil.
Ideally, you should mix your growing medium that should consist of one-third quality potting mix, one-third perlite, one fifth orchid bark, and one-fifth gravel or coarse sand.
- Potting mix: provides a reasonable amount of water-retaining material.
- Perlite: helps you moderate this water retention and aerates the soil.
- Orchid chunks: something for the Hoyas roots to grab onto as they would in their natural habitat.
- Gravel or coarse sand: acts similar to perlite but is heavier and more long-lasting, so it gives you further assurance that the soil is not going to be packed, even at the bottom of the pot.
Light
Hoyas are one of those plants that are falsely advertised as low light plants. Sure, they will tolerate lower light conditions, but they will require dappled indirect light if you want them to flower.
They are not suited to withstand direct bright light and can get sunburns, so south-facing windows are not quite ideal.
A hoya should never be exposed to the midday sun. But an east-facing window a little further away from the light source should e perfectly suitable for your Hoya diptera.
That should provide the right amount of light, so it has the strength to flower during the growing season.
Watering
Watering can be tricky with Hoyas. Even though they are not very thirsty plants, there are a couple of things to consider when watering a Hoya diptera.
First of all, they grow in extremely light and airy, growing mediums. This means you might have to water them more often than you other plants.
It is also harder to notice when soils like this are dry, as they are so chunky you have to really get in there and check.
Secondly, while your Hoya diptera will not require a lot of water, it does require a routine and a regular watering schedule. They will not do well if you keep on forgetting to water them, as well as if you water them too soon.
So, a good rule of thumb would be watering it once a week, but be mindful of your particular microclimate.
Once you figure out what your watering schedule should be try to stick to it as Hoyas dislike sudden changes and will let you know so by dropping leaves.
Temperature
Hoyas prefer temperatures between 60°F (15°C ) and 95°F (35°C). They do not handle frost well and will suffer in temperatures that are continually too warm.
As I have already mentioned in the watering section, Hoyas’ dislike of sudden changes extends to temperatures as well.
Consequently, you should find a place in your home where it will not be exposed to drafts and too much air movement. Things to avoid:
- Ventilators and air vents: they displace humidity making the air dry
- Doors or windows that frequently open: especially during the winter, as sudden drops in temperature can shock the plant.
- Heat sources like radiators and heaters: also make the air drier and can overheat a plant.
Humidity
Your Hoya diptera will tolerate low humidity, but if you want it to thrive and flower regularly, you should consider providing a higher humidity of around 70 to 80%.
Many people think that Hoyas don’t need much humidity since they have semi-succulent leaves, but this couldn0t be further from the truth.
For example, the Hoya diptera comes from the Melanesian islands, where the average humidity is around 80% year-round. Consequently, you can imagine that the average indoor humidity in most temperate climates will just not cut it.
You can do a couple of things to remedy that, but firstly, I would like to mention misting should not be one of those.
Misting a Hoya is asking for trouble, as its leaves can be susceptible to mildew if the water is left standing on them, and proper ventilation is not provided.
So, the ideal course of action would be a humidifier, but a pebble tray could be of help if that is not within your financial or spatial reach.
Fertilizer
There are many different opinions on fertilizing Hoyas, and most Hoya collectors end up learning from their mistakes and adjusting as they go.
But there are still a couple of pointers you can pick up to give yourself higher chances of success.
When choosing fertilizers, I always recommend organic over synthetic. This preference is simply based on the fact that organic fertilizers tend to be gentler and decrease the possibility of fertilizer burn.
In that case, during the growing and flowering season, you should feed your Hoya every two weeks.
If you are still opting for synthetic fertilizer, this is fine, but remember to dilute it to half it’s strength and to feed your Hoya diptera on a monthly basis only.
Propagation
Hoyas are most successfully propagated by cuttings, and the same goes for the Hoya diptera. The cuttings can then be rooted in various mediums; depending on what you have available, they will do fine in water, soil, or sphagnum moss. Here is a step by step process and some tips for propagating your Hoya successfully.
- Choose a healthy and relatively your cutting that is not putting out new growth or flowering. It should have at least one node from which the roots will grow and a couple of leaves to keep the cutting alive.
- Always sterilize your shears or knife with alcohol before making any cuts on the plant. It is a good habit to avoid any diseases or fungal issues.
- You can dip the cut on the cutting in some rooting hormone.
This is not strictly necessary, and your Hoya diptera will almost definitely root without it. - Prepare the medium for the cutting. If it is water, choose distilled water.
If it is soil, do it with a denser soil heavier on actual potting soil and moisten it before you put the cutting in.
If it is sphagnum moss, moisten that as well. - Put your cutting into it’s rooting medium. In short, your goal should be to ensure the node is covered and in contact with the rooting medium.
So, if it is water, submerge the node fully and leave the leaves out.
If it is soil, make sure you cover the entire node.
If it is sphagnum, wrap it around the stem and make sure the node is in contact with the sphagnum; otherwise, it won’t root. - Now you wait, but while you do, you can pamper your cuttings some more.
Make sure they are in a well lit, warm spot.
High humidity will also exponentially increase your chances of success. Enclose the cutting in a plastic bag or put it under a humidity dome.
Remember to open it and ventilate it regularly to avoid rotting and molding. - When you can see a couple of inches of well-developed roots, you can replant your cutting into a normal Hoya growing medium and leave it be.
- You should still make an effort to keep it in a decently humid space and keep an eye on it for potential pests and disease.
New cuttings are most susceptible to those while the plant is still not well established.
Growth
Hoya diptera can grow up to 12 feet in length (3 to 4 meters). In their natural habitat, they have been observed to grow over 40 feet (12m), but this is very hard to achieve in most indoor conditions.
They grow in a vining fashion, so giving it some kind of support system is a must. Either give it a sturdy trellis or a moss pole to support its vines and flowers.
Potting
Because of its epiphytic nature and the tendency to get root rot, I always recommend planting your Hoya diptera in a terracotta pot.
Terracotta is your secret little helper against water damage and another measure you can take to prevent overwatering and waterlogging. Terracotta is an organic material, and it absorbs water.
Consequently, if you tend to love your plants a little too much and go overboard with water, the pot is there to absorb some of it.
Still, remember to choose a pot with at least one drainage hole.
As far a repotting, it is recommended to re-pot Hoya dipteras regularly. Once every season or two would be best, to give it a fresh change of soil.
If you decide it is time to give it a bigger pot, don’t go overboard and increase the pot size by only an inch at a time.
Common Problems with Hoya diptera
As semi-succulent plants, Hoya diptera are a treat for pests. Mealybugs seem to be the most common pest on Hoyas in general, but spider mites and scale are also potential threats.
Let me take this chance to remind you that the first line of defense against pests is a healthy, well taken care of plant.
Any stress or discomfort that the plant experiences opens a door for insects, bacteria, and fungi to attack. So keep your plant healthy and maintain it properly, and you are already halfway there.
Mealybugs
Mealybugs are round white crawlers that look like tiny cotton balls. Don’t let their cute and furry appearance fool you; they are not here to make friends.
They are here to find the softest part of your plant, usually new growth, undersides of leaves and nodes and suck the sap from your plant.
They are generally not very dangerous. You will notice them before they have done some irreparable damage. They are also relatively slow and big enough to easily spot.
When you do, arm yourself with a q tip dipped in alcohol and go at them one by one. The bug will die in contact with the alcohol.
Do this repeatedly to control their numbers until they disappear entirely. If they persist and your plant is suffering, don’t hesitate to go for an insecticidal soap treatment.
Spider mites
Spider mites are not as harmless as mealybugs are. They are smaller, harder to find, and come in more significant numbers.
If you look closely, you will see tiny spider-like creatures gathering on the leaves’ undersides and at the nodes, and fine spiderwebs forming everywhere.
When I spot spider mites, an alarm sounds in my head, and I quarantine the plant right away (spider mites spread like crazy). In my experience, and it has been lengthy with spider mites, nothing works as well as making the environment less habitable for them.
You can try everything from neem oil to insecticides, but if you are not successful, remember that spider mites love hot and dry environments.
Consequently, consider transferring your plant to a bathroom or somewhere darker, colder, and more humid to control their numbers and bury them for good.
Scale
Scale can be tricky, as they have a fantastic method of self-defense. As you might already know, scale looks like tiny little shells attached to the stems of your plant.
Under the shell is a small insect, sucking on the sap of your plant. No amount of insecticide will work if you don’t dislodge the shell first.
So, either go one by one and scrape them off with a fingernail/dull knife or grab a toothbrush and brush them off.
The key here is to catch them and remove them as they detach, don0t let them fall onto the soil or somewhere else on the plant.
You can either go at them with a q-tip and alcohol or do an insecticidal spray when you are done.
Sieh dir diesen Beitrag auf Instagram an
Tips to keep your Hoya diptera problem-free
- Give it a well-draining, light, and chunky medium to grow in
- Do not overwater, but have a regular watering schedule
- Fertilize with organic fertilizer every two weeks or so
- Keep away from drafts and heat sources
- Do not move frequently
- Give it high humidity
Frequently asked questions about Hoya diptera
Why are my Hoyas leaves yellowing?
Yellowing leaves on a Hoya diptera are most commonly a sign of overwatering or underwatering.
Scrutinize your watering schedule, consider employing a humidity meter if you are having trouble, and reconsider how often you water your Hoya diptera.
Why are my Hoyas new leaves the wrong shape?
Ideally, all new leaves should be the same shape. New leaves that have a wonky shape are a sign of stress.
Expect them when you know your plant has been moved, changed environments suddenly, or you forgot to water it.
A routine is essential for Hoyas, and they will let you know when you are not diligent enough.
Why are new shoots from my Hoya diptera drying up and falling off?
Hoyas sometimes put out new shoots when looking for better conditions. When the spot they reach is not to their liking, they will simply reject the vine and try elsewhere.
So, this is not a sign of worry and can happen sometimes.
Conclusion
The Hoya diptera is a fast-growing Hoya that might not be appropriate for total beginners. Since it is relatively rare, I recommend you polish your hoya maintenance skills on another, cheaper, and more common Hoya.
But if you are up for the challenge and like routines, this plant will thank you for its beautiful buttery yellow inflorescence.
Did this article scratch your Hoya itch? If not, check out our article on the Hoya mindorensis; it might be just what you are looking for.


Daniel has been a plant enthusiast for over 20 years. He owns hundreds of houseplants and prepares for the chili growing seasons yearly with great anticipation. His favorite plants are plant species in the Araceae family, such as Monstera, Philodendron, and Anthurium. He also loves gardening and is growing hot peppers, tomatoes, and many more vegetables.