(image credit, IG: overwaterman)
During my travels through Eastern Australia, I noticed one ubiquitous plant in pretty much every home backyard. It was the wonderfully lush and low maintenance Cunjevoi Lily.
But this was no lily. I soon found out it was a tropical evergreen called Alocasia brisbanensis. No one necessarily waters it in its native areas.
They simply grow Alocasia brisbanensis in shaded spots in the yard away from walkways, where the soil is naturally somewhat damp and the air is warm and muggy. Just like that these plants grow quite large.
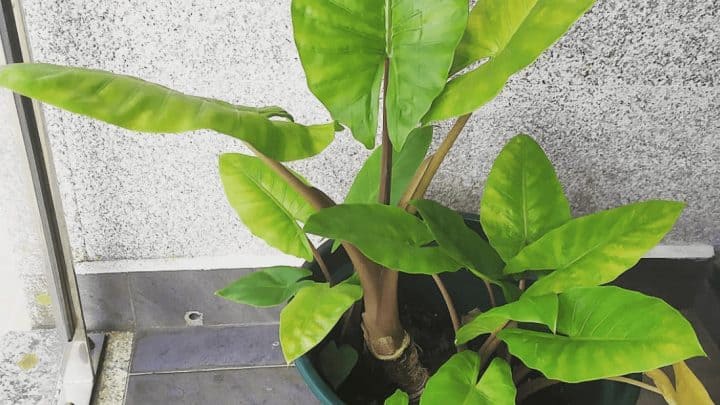
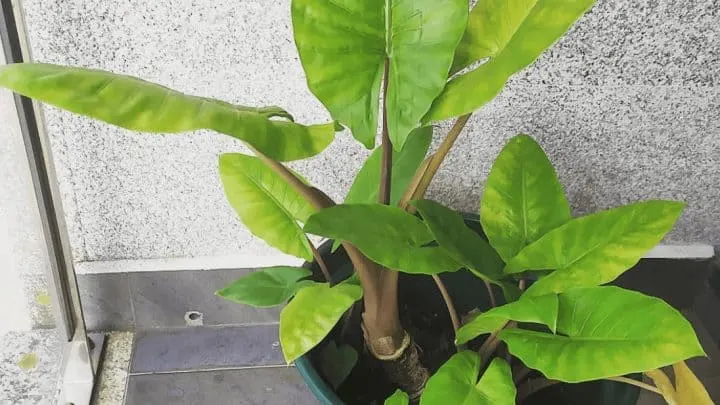
The leaves are glossy shiny green and spade-shaped, often compared to elephant ears because of the size.
They are held out by very fleshy green petioles that are sometimes as thick as human arms. On a fully grown plant, the leaves get as big as 2.5 feet.
You can grow Alocasia brisbanensis in a far corner of an outdoor garden or a tropical greenhouse. Due to its largeness, I wouldn’t recommend it for indoor growing unless you have loads of space.
Alocasia brisbanensis is a species of plants from the family of Araceae, so the inflorescences are your typical spathe and spadix type.
These monocots are greenish-white and fragrant and can be seen in mature Alocasia brisbanensis plants.
[toc]
Alocasia Brisbanensis Care Guide
Soil
Alocasia Brisbanensis care becomes a lot easier if you’re looking to grow them outdoors straight in the ground.
Choose a spot that has quick-draining soil that’s not clayey. They will thrive if the substrate is rich in broken down organic matter that adds to soil looseness and airiness.
The way I’ve been preparing the ground for giant fleshy aroids such as Alocasia Brisbanensis is to dig a pit in the ground to about 1.5 to 2 feet deep and about 1 to 1.5 feet wide.
I make a mixture of soft rich garden soil, sand, plenty of garden mulch, coco-peat, garden compost and animal dung manure and any other organic drainage materials like bark, nut shells, coconut-chips etc.
This soil prep is an ideal Alocasia Brisbanensis care hack because the roots love the warmth and moisture-retentiveness that this mix provides.
Pro tip: use a raised spot along the edge of your yard or the mound of a tree to grow Alocasia Brisbanensis – this way the landscape will allow for natural draining of excess water.
Light
These plants are found growing as an understory plant where there’s a gap in the canopy. That’s the best clue nature can give us to arrange for the right light levels for Alocasia Brisbanensis care.
Basically, they love full-sun to partial sun for most part of the year i.e. about 70-85% sunlight. Dappled light is the best so that the leaves don’t burn out. They can take a bit of shade if it’s generally bright.
The lush green leaves need the light to make their chlorophyll. I’ve noticed that in too much shade they lose their vigor and also become susceptible to root root. So, be generous with lighting when you grow Alocasia Brisbanensis.
Watering
Alocasia growers will often tell you to dry out the soil between waterings. In my own experience growing Alocasia Brisbanensis, they do very well in high moisture levels throughout the warm growing season (whenever that comes on your side of the hemisphere).
I’ve been watering my plants pretty much every day. But once the weather grows cool I cut back on watering.
You see, the roots absolutely love moisture but they don’t like to sit in water. If your soil is well-draining you’re sorted as far as water logging is concerned.
The fleshy stems and petioles of this giant plant hold a lot of moisture, so they can take some drought, particularly the mature plants.
Overall, for lush growth and plenty of new leaves, you’ll need to keep the soil evenly moist for the most part, until winter hits.
Temperature
Alocasia Brisbanensis plants are suckers for warm temperatures between 60°-80°F (16°-27°C). These plants become dull and slow-growing with prolonged exposure to temperatures below 60°F (16°C) and may even lose their leaves.
The plant can even take slightly higher temperatures. But they are simply not frost resistant and die quite dramatically if exposed to frost.
Another important Alocasia Brisbanensis care aspect is that they don’t do well in wild temperature fluctuations. That’s why in their native they thrive in the coastlands where the temperature is moderate throughout the year.
This means that if you want to grow Alocasia Brisbanensis in your greenhouse in winters, keep it away from radiators air, and cold drafts.
Humidity
For the ideal Alocasia brisbanensis care you need to surround the plant with warm wet mugginess. They occur natively in the warmer coastal and inland-coastal areas between Sydney in New South Wales all the way up to far north Queensland. These regions have very high humidity.
It is relatively easy to manage the humidity needed for Alocasia brisbanensis care if you have a greenhouse arrangement.
If not, there’s another Alocasia brisbanensis care hack that I’ve been using in my garden. The huddle. Just surround your little giant with several tropical plants creating a micro humid zone.
Spreading a thick layer of sterile mulch around its base is also great to make the air muggy. Misting is good if you do it in the day time and let the leaves dry air out by evening.
Fertilizer
This plant isn’t a heavy feeder. If you grow Alocasia brisbanensis in a substrate rich in organic manure, I don’t believe it needs a lot more. All the decomposed leaf mulch, compost, peat, and bark matter mixed with rich soil acts as organic food for the plant.
That said, it is a plant that responds well to regular feeding, so, your bi-monthly Alocasia brisbanensis care schedule could include a balanced organic fertilizer rich in nitrogen, which you can pick up from your local store.
I would recommend you go for a balanced liquid foliage boosting one. This allows you to regulate concentration quite easily. Make sure to thin down the concentration to one third of the prescribed level.
Remember to stop feeding the plant completely in winter month along with cutting back watering. The winter Alocasia brisbanensis care must be limited to just moisture management.
The reason I prefer organic feed over chemical fertilizers, particularly for aroids like Alocasia is because they are slow-release and safe to use. Excessive fertilization can burn the roots and you’ll end up with an Alocasia brisbanensis all yellowed up.
Propagation
Home growers don’t have a lot of different options to propagate Alocasia brisbanensis because they are tuberous plants that sprout from a central rhizome or thick stem. They don’t have stems or vines that can be cut and potted for rooting. So the best way to propagate Alocasia brisbanensis is by root division once the mother plant makes pups at the base.
Growth
If you grow Alocasia brisbanensis in your garden under proper conditions, this plant ends up getting quite large, as large as 4.5 to 7.5 feet (1.5 to 2.5 meters).
They are massive self headers with large glossy leaves that can grow as big as 3.25 feet (100 cm). The leaves grow erect and fleshy winged petioles.
The flowers are perfumed, greenish-white in color, and very similar to an arum lily i.e. with a spathe and spadix formation. They develop into a bright red fruit with small red berries clustered densely along the spadix.
Even though I grow Alocasia brisbanensis as a foliage plant I quite enjoy this whole flowering-fruiting process.
Due to the largeness, there’s simply no question of trying to grow this inside your house. As easy and low maintenance as this plant is, only serious gardeners grow Alocasia brisbanensis outside its native regions particularly in the cold zones. That is because it needs a tropical greenhouse.
Potting and pruning
Potting is simply not a relevant activity for a tropical giant that loves growing in the ground. If however you grow a juvenile Alocasia brisbanensis then yes, you can pot it. You can use a succulent mix with peat and organic manure to pot juveniles.
But, the plant doesn’t scale to its fullest tropical glory in a pot. So, transfer to the ground as soon as you can.
This plant doesn’t need pruning. It’s a self header with a very short and stocky stem. It is sufficient to keep clearing off the dying leaves for Alocasia brisbanensis care.
Sieh dir diesen Beitrag auf Instagram an
Propagation of Alocasia brisbanensis – Step by Step
As explained before, the only method of propagating Alocasia brisbanensis is through the division of basal plantlings. I warn you, the process can get quite messy. You’ll need to be prepared to get your hands dirty.
- Choose a plant that has plenty of plantings around the base
- Water the plant so that the soil is loosened up
- Dig on the side that you can see the baby plants with a garden spade. You may have to dig about 6 to 10 inches deep carefully avoiding the plant.
- Use your fingers to carefully loosen the soil at the base until you see a corny clump that forms the base of the baby plant where it joins the mother plant.
- Identify the roots of the baby plant. As a thumb rule, you need to dig at least until you can see the roots of the baby plant.
- With a sterile knife, slice the plantling along with the corms and gently pull it off the mother making sure that its shoot and roots come with it.
- Pot the newly divided sections separately.
- Water well for a few after potting until your Alocasia brisbanensis is well established
Here are some problems you might encounter during propagation. The roots of the plantling sometimes run very deep and won’t dislodge easily.
You may even snap the root when trying to extract it from the soil. Don’t bother too much about it. Even if the plantling has a few roots it’ll survive as long it receives proper Alocasia brisbanensis care.
Common Problems with plant Alocasia brisbanensis
Caterpillars
The crunchy leaves of Alocasia brisbanensis are often a delicious salad for caterpillars. You’ll just need to be watchful for holes on the leaves and immediately get rid of the caterpillar that’s causing it.
Leaves dropping all of a sudden
If the plant is exposed to a cold draft in your greenhouse for being next to the entrance or window, that could cause all the leaves to droop.
Sudden wilting or drooping of leaves
The common reason is underwatering. However, if this is happening despite regular watering then this could be due a root rot caused due to overwatering or due to a fungal infection of the roots. Check the base of the plant immediately. For a tuberous plant like Alocasia brisbanensis there’s unfortunately little that you can do if it goes to a root rot. Prevention is the key to Alocasia brisbanensis care.
Leaf yellowing
This may start with the lower leaves first, before spreading to all of the leaves. One of the common reasons for this is over fertilization or buildup of salts in the soil due to cheap fertilizers. Water deeply three or four times, each time letting all the water drain out. This should help wash off the salts.
Leaf edema
If you find damp waterlogged discolored blotches on the leaf this is the result of chronic overwatering causing disease in the plant. Change the soil and make it a very loose aerated one. Get rid of the diseased leaves.
Wet brown spots on the leaf
If the spots have a foul smelling ooze to them then it could be bacterial leaf spot disease. It is important that you get rid of the affected leaves immediately. The bacterial spreads through water droplets on leaves. Cut down the watering and mainly stop getting the leaves wet completely.
Common pests
Alocasia brisbanensis care is quite easy when it comes to pest control. These are hardy tropicals that are naturally pest resistant. Occasionally you may find sucking pests and most commonly aphids.
The easiest way to get rid of aphids is to blast them off the leaves with a strong stream of water. An insecticidal concoction made from neem oil and horticultural soaps is safe to use on your Cunjevoi Lily to keep it free of sucking pests.
Another Alocasia brisbanensis care hack is to use a solution of vinegar diluted with 3x the water. and spraying the underside of the leaves. All of these measures must be carried out on the morning of a sunny day.
Tips to keep plant Alocasia brisbanensis problem-free
- These are some hacks for Alocasia brisbanensis care that I’ve learnt over the years.
- Alocasia Brisbanensis is a large tropical meant for outdoor growing
- The spread out laterally, so give them a spot away from pathways
- You must grow Alocasia Brisbanensis evenly moist soil that drains well. The best way to achieve this is to plant this on a raised mound propped up with bricks
- The mound structure makes plantlet separation easy in case you want to propagate Alocasia brisbanensis at some point.
- Keep the temperature moderate and free of wild fluctuations throughout the year.
- Generous amount of sun, preferable dappled sun and damp air are good for Alocasia brisbanensis care
- High humidity promotes lush growth and shiny foliage, so it is a good idea to mist the plant regularly.
- Liquid fertilizer over a solid one and ideally organic feed. Fish emulsion is a great choice of feed to grow Alocasia brisbanensis
- Wash the leaves regularly to prevent pests and dust accumulation. But make sure to dry out the leaves after washing.
Frequently asked questions about plant Alocasia brisbanensis
Is Alocasia brisbanensis poisonous?
All parts of this plant are poisonous, due to the presence of calcium oxalate crystals. If it comes in contact with skin or eyes it can lead to irritation. Eating it causes immediate pain, burning sensation, and swelling of the lips, tongue, and mouth.
Is Alocasia brisbanensis edible?
Well, despite what I said about Cunjevoi Lily being poisonous, the cooked form of this plant is hard to process but apparently edible. It is related to the Taro plant and grown in various warm zones of Australia as food. It is consumed by the aboriginals after a lengthy preparation that takes days. All in all, don’t take a chance with it.
Can you propagate Alocasia brisbanensis from a leaf?
It cannot be propagated from the leaf. Due to its tuberous nature, the easiest Alocasia brisbanensis propagation method is plantlet separation as explained above.
Can you grow Alocasia brisbanensis indoors?
This plant is too big to attempt growing indoors. Besides, it needs a full blast of sun. If you have a juvenile plant you may be able to grow it for about 2 years at max after which it’ll start showing stunted growth.
Conclusion
There are several species of the genus Alocacia that are close in appearance to Alocasia brisbanensis. They are very commonly found in the warm and humid Pacific Islands, Oceania, and Southeast Asia.
One of them is the Alocasia macrorrhiza which is strikingly similar to Alocasia brisbanensis and it takes an expert eye to tell them apart.
However, the care requirements are the same. So, if you end up with a slightly different Alocasia, not to worry. Just follow the Alocasia brisbanensis care guide and you’ll be fine. Happy gardening!


Daniel has been a plant enthusiast for over 20 years. He owns hundreds of houseplants and prepares for the chili growing seasons yearly with great anticipation. His favorite plants are plant species in the Araceae family, such as Monstera, Philodendron, and Anthurium. He also loves gardening and is growing hot peppers, tomatoes, and many more vegetables.