
While staying indoors helps to shield us from the current happenings, it can get pretty lonely and dull. It is why we recommend some green therapy.
Keeping or decorating with houseplants not only brings your home to life; it also boosts your mood.
And, it doesn’t even have to be a taxing project, if you choose low-maintenance plants like Alocasias. In particular, I’d recommend Alocasia odora.
This plant has gigantic, lush leaves, which are sure to add some drama to your home with minimal effort.
It also has a sweet scent, so it adds an extra level of richness to your space. In this post, we’ll look at everything you need to know about taking care of Alocasia odora.
Alocasia odora care entails a well-draining potting mix using soil, perlite, and peat. place your Alocasia in a spot with bright indirect light. An east-facing window is ideal. Keep the soil on the drier side and water only once the top 2-3 inches of soil are completely dry. The ideal temperature range lies between 15°C and 30°C (59°F and 86°F). Humidity should be moderate to high around 70% or more. Feed your plant once every two weeks in spring and summer and reduce it to once a month in autumn and winter.

[toc]
Alocasia Odora Plant Profile
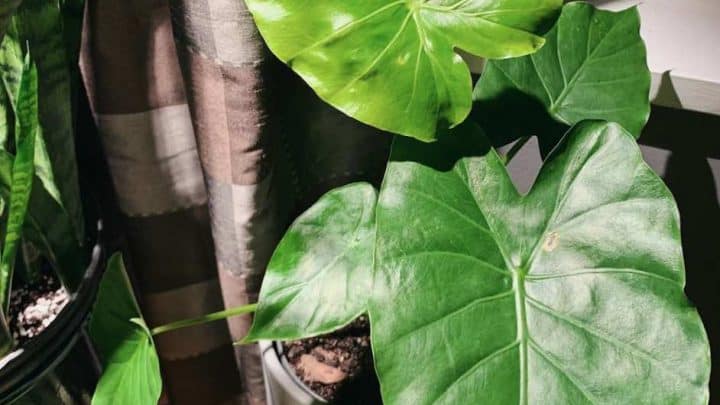
The first thing you’ll notice about the Odora is its striking beauty. The rhizomatous evergreen plant is known for its distinct lush green foliage, which is borne on sturdy stems.
These leaves are shaped like elephant ears, making them look fairly similar to the likes of taro and Colocasia gigantea.
What sets the Odora apart is the fact that its leaves point skyward, while those of most Colocasias point downward.
Any new leaves that form on this plant tend to have a lime green hue, and they glow beautifully till they start to age and get outshined by younger leaves.
Another part that draws gardeners to the Alocasia Odora entails its flowers.
The blossoms tout a gorgeous pale peach spathe and spandex. Better yet, they have a lovely scent, which becomes more prominent at night. This explains why the plant is also referred to as the night-scented lily.
Alocasia Odora Care Guide
Soil
The secret to helping your Alocasia Odora thrive is to lay a good foundation, and that starts with using a quality potting mix. When choosing the medium to grow this plant in, consider one that has proper drainage.
This ensures that the plant doesn’t sit in soggy soil, which would otherwise cause the rhizomes to rot. If you are using regular soil such as loam or sand, be sure to incorporate a bit of organic matter to enrich it.
Personally, I prefer to make my own potting mix as opposed to using store-bought versions. It usually consists of soil, perlite, and peat in the ratio of 1:1:1. Adding perlite and peat improves not only drainage but also aeration. Plus, it’s well-draining.
Light
Alocasia Odora fares best in a spot exposed to bright indirect light. You can place it on an east-facing window sill or any spot exposed to full light from either a west– or south-facing window.
Since my window is located strategically, I prefer to place my Odora on the windowsill. However, I always install a curtain sheer to filter the direct rays of the sun. This way, the foliage doesn’t get scorched.
Ideally, natural light is the best form of lighting for houseplants. This is because it strikes an excellent balance between blue and red light. But not everyone is able to provide this type of light.
If you’re growing your plant in a basement or other space with zero access to natural light, you’ll have to supplement with artificial light sources.
Specifically, I’d recommend fluorescent bulbs, which are 2 and ½ times more effective at transforming electrical energy into light energy. The latter is what plants need to grow.
Moreover, these light fixtures produce very little heat. It means that you can place your Alocasia as close as you want to the light source.
Watering
Here’s one thing you need to know about Alocasias. They prefer growing media that is slightly on the drier side.
It means that you’d rather underwater than overwater, although neither of these situations is ideal. So in terms of frequency, wait until the top 2 to 3 inches of the top layer of soil/potting mix dries before watering.
By following this principle, I end up watering my Odora just once every three to four weeks.
In addition to checking the water levels, another way to determine whether you’re overwatering your plant is to watch out for signs. The most common signs of overwatering include:
- A collapsed base
- Moldy potting mix
- Yellowing of older leaves
- Plant death
Temperature
The Alocasia Odora prefers a spot with a warm temperature. This is not surprising given that it’s a tropical plant. The ideal temperature is one ranging between 15°C and 30°C (59°F and 86°F).
Avoid placing your plant near doors and windows that are opened frequently as it doesn’t tolerate cold temperatures very well. On the same note, don’t place it near air conditioning units.
Humidity
When it comes to humidity, you’ll want to provide moderate to high humidity; no less than 70%. So if you live in an arid climate, you might want to invest in a quality humidifier.
Alternatively, consider misting your odora with a spray bottle, to prevent its leaves from drying and wilting.
A pebble tray is another feasible solution. To create a pebble tray, look for a waterproof tray; should have almost the same width as the base of your pot.
Next, place pebbles inside that tray, then put your potted plant on top of them. Fill the tray with water but ensure the pebbles sit slightly above the waterline.
How does placing your pot on a pebble tray aid in humidity? Well, the water inside the pebble tray will begin to evaporate. As a result, the moisture levels around the plant will increase.
Fertilizer
Generally, Alocasias are heavy feeders. It means that you’ll have to arm yourself with quality fertilizers to feed your Odora.
When it reaches peak growing season- which typically happens in spring and summer- feed your plant once every two weeks.
You can then reduce to a frequency of once per month in winter. This is because it won’t be able to make the most use of nutrients when the temperatures plummet.
Propagation
Since it’s a rhizomatous plant, the easiest way to propagate the Alocasia Odora is using its rhizomes.
If you’re growing your plant outdoors, start by digging around it; dig no less than 12 inches so that you don’t damage its root system.
Next, carefully lift it from the ground surface. This should reveal several long tubers just slightly underneath the ground surface.
If you’re growing your Odora indoors, follow a fairly similar process. However, dig just enough to avoid wrecking its root system.
The next steps are incredibly easy as all you’ll need to do is brush away the soil and partition the tubers. You can then grow each of these tubers in its own pot.
Simply; fill a different pot with your preferred mix, preferably one that is rich and damp.
Plant your new rhizome so that it’s at the same depth as it was before. After planting, place the container in a partially shaded spot.
Remember to water your new plant as needed. You should start to see new growth before long.
Growth
If provided with all the right conditions, your Alocasia Odora can grow very fast.
It means that if your plant is growing very slowly, it could be that it’s suffering from the stem or root rot. This could also mean that it’s not receiving enough light.
When it comes to size, the Odora grows up to 8 ft. (240 cm) high with a spread of 2 to 3 ft. (60 to 90 cm). Its leaves are particularly large, growing up to 2 ft. (60 cm) long and 1 ft. (30 cm) wide.
Potting
Like other Alocasias, Odora doesn’t need to be repotted often. In my experience, I repot my plant just once per year, once it becomes root-bound.
If you’re planning to repot your plant, ensure you transplant it to a potting mix with traits similar to the original one.
It means that it should be rich with proper drainage. Although the pot also needs to be larger, just go a size or two higher. This way, it doesn’t compromise the soil’s drainage.
Another thing I like to do is to divide the rhizomes of my Odora, at least once every year. This keeps it at a manageable size.
View this post on Instagram
Common Problems with Alocasia Odora
When well taken care of, Alocasia Odora grows healthily, to become a focal point in whichever space it’s placed.
However, it may be infested by common household pests, primarily spider mites and mealybugs. Here is a simple guide on how to deal with each of these bugs:
Spider mites
As their name might lead you to believe, spider mites are eight-legged creatures classified in the arachnid family. These pests are the most likely to attack an Alocasia Odora being grown indoors, partly because they don’t encounter any natural predators at home.
So how do you know whether your plant is being infested by a spider mite? Well, the most notable sign is webbing on your plant. The foliage that was once vibrant green may also turn a splotchy yellow.
If you notice any of these factors, you should take immediate action. Start by hosing your Odora under your kitchen sink. A shower faucet will also work well. Doing this helps to dislodge the pests from the plant.
Next, apply an insecticide of your choice. I prefer to use organic pesticides like neem oil, mixed with a tiny amount of water.
Not only is it effective against common household pests, it’s also non-toxic. This means I don’t have to worry about using it in the presence of kids and pets.
If you’d placed your Odora in close proximity to other plants, now is a good time to separate it. Also check to ensure no other plant has been infested with this pest.
Mealybugs
Apart from spider mites, mealybugs are another species that’s likely to attack your Alocasia Odora.
Thankfully, it’s also one of the easiest to identify. If your houseplant looks like it’s covered in snow or its foliage has tiny white spots, mealybugs are the most likely culprit.
To get rid of them, first look for some cotton balls and swabs. Drench them in alcohol, then use them to clean the foliage. Be sure to clean inside the gaps too.
Next, add a couple of drops of dishwashing soap to 1 cup of rubbing alcohol and a quart of water. Stir vigorously, then put the resulting solution into a spray bottle.
You can then use this homemade insecticide to treat your Alocasia, and any other houseplants you suspect are infected. Repeat this treatment one to two times each week, till you are certain that the problem is dealt with.
Tips to Keep Alocasia Odora Problem-Free
If you want your Alocasia Odora to grow without any problems, there are a few rules you should stick to, such as:
- Never expose your plant to direct sunlight; even if you grow it outdoors, place it in a partially-shaded spot
- Allow the top few inches of soil to dry between waterings
- Maintain a warm temperature;15°C to 30°C (59°F to 86°F) and moderate humidity (at least 70%)
- Remember to fertilize your plant every once every two weeks, but reduce the frequency during winter
- Repot your Odora if it becomes too root-bound to give it more room for growth
Frequently Asked Questions about Alocasia Odora
Is Alocasia Odora dangerous?
All sections of the plant contain a common biomineral known as calcium oxalate.
Usually found in the form of crystals, this compound is toxic. If you ingest accidentally, you will feel like your mouth, tongue and throat are being jabbed with a thousand tiny needles.
However, this biomineral breaks down once the plant is fully dried or cooked, making it non-toxic. So if you wish to consume it, either dry it completely or cook, otherwise, it’s unsafe.
Still, there are certain groups of people who should steer clear from eating this plant altogether. This entails people who suffer from the following conditions:
- Rheumatism
- Arthritis
- Gout
- Kidney stones
- Hyperacidity
Why are the leaves on my Alocasia Odora drooping?
There are several reasons why your plant’s leaves could be drooping, such as:
- Under- or overwatering
- Lack of enough nutrients
- Pests
- Insufficient lighting
First, assess your watering schedule and determine whether it needs to be adjusted. Remember to allow it enough time to dry between waterings.
If your watering schedule isn’t the culprit, consider the lighting in the spot where you place your plant. Does it receive sufficient natural light?
If not, consider supplementing with some grow lights. If all these factors aren’t the problem, it means your plant has outgrown its pot. Alocasias are one plant species that grows rapidly, and the odora is no exception. If this is the case, consider transplanting it to a slightly bigger pot.
Conclusion
One of the best indoor plants that you can add to your home is Alocasia Odora. It’s enormous, vibrant and sweetly-scented.
Plus, it’s very easy to care for. All it needs is bright indirect light, moderate humidity, warm temperatures, and water only when required.


Daniel has been a plant enthusiast for over 20 years. He owns hundreds of houseplants and prepares for the chili growing seasons yearly with great anticipation. His favorite plants are plant species in the Araceae family, such as Monstera, Philodendron, and Anthurium. He also loves gardening and is growing hot peppers, tomatoes, and many more vegetables.