
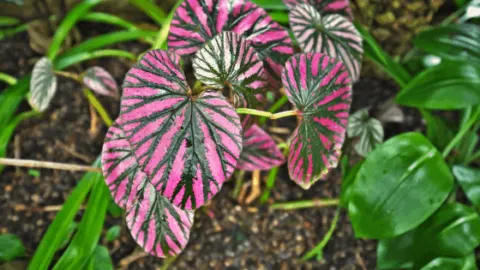
The Begonia brevirimosa will make anyone look twice. Doesn’t it look like the perfect combination of botany and art? And even though it looks like some kind of man-made or alien creation, this plant is not cultivated and what you see is what nature made.
To care for Begonia brevirimosa keep temperatures in the range between 60 and 85 degrees Fahrenheit (16-29°C), use a well-draining soil mix, and provide bright indirect light. Water when the soil is about to dry out about once a week and keep humidity above 45%. To fertilize use a balanced, 20-20-20 fertilizer diluted to half strength.
Specifically nature in Papua New Guinea where so many of these striking plants come from. You might be thinking- ok, here we go with the super demanding conditions and terrarium suggestions, but wait!
Begonia brevirimosa belongs to the Begoniaceae family in the class Magnoliopsida according to the University of Connecticut.
Stay for a while, as this is a fibrous begonia that I am certain anyone can grow in their home and take care of. Let me tell you about all of the easy tips and tricks you should have up your sleeve to make sure a Begonia brevirimosa thrives in your home.
[toc]
Begonia brevirimosa Care Guide
Soil
As with most Begonias, pay close attention to the soil it is growing in. A Begonia brevirimosa should grow in a well-draining soil mix rich in coco coir and perlite.
You can mix the classic one part orchid back, one part growers soil, and one part perlite mix and it should do the trick. As far as acidity is concerned, you should not worry much, they like neutral to slightly acidic soil.
Light
I probably don’t have to explain to you that most of your energy regarding the care for this plant should go into finding the perfect light conditions.
With the Begonia brevirimosa’s main attribute being its vivid colors, it would be a shame for it to become pale, discolored, or even sunburnt.
Sufficient light will be needed to maintain it’s almost fluorescent pink variegation. Provide your Begonia brevirimosa ample bright but indirect light.
If you do this right, your plant will keep it’s intense markings and flower more often. When kept in conditions that are too dark, they tend to become pale and leggy, trying to reach for some much-needed light. It will also not flower.
If you put it in direct sunlight it will most definitely get sunburned and the leaves could become brown and curl up.
For these reasons, an east or west-facing window will be fine. You could also opt for a south-facing window but remember to place the plant further away from the window to prevent sunburns.
Watering
Watering is often one of the tricky things to master with new plants, but if you have ever owned a fibrous begonia before you will probably get the hang of it fast.
Begonias don’t like wet feet and overwatering, which is why you should let the soil dry out between waterings.
Always do a finger test with begonias, and water only when the soil is trying at least two knuckles deep.
The timing will vary depending on the season and humidity in your home, but once every week or two should do the trick.
An underwatered fibrous begonia will recover quickly when watered, fixing root rot and fungal issues that are a result of overwatering is a whole other, much more complex issue.
During the winter it will require even less water, so watering it once a month will be enough.
Temperature
Your Begonia brevirimosa is a tropical plant, therefore it comes as no surprise ti likes warmth. Not extreme warmth like some, but keep your plant in an environment that is between 60 and 85 degrees Fahrenheit (16-29°C).
Some say that it can tolerate lower temperatures, as low as 40, but they are definitely not frost hardy and should not be left outside during the winter in a temperate climate.
Humidity
Begonia brevirimosa like high humidity. They can do reasonably well in normal, indoor humidity between 45 and 50%, but will appreciate anything above that.
You probably don’t want crispy edges or dry tips on these dashing leaves, so I recommend leaning on the safe side and giving it as much humidity as possible. Consider a humidity tray, humidifier, or even a humidity dome if you have very dry air.
A humidity tray is a tray with pebbles that are almost submerged in water, in such a way that you can put your plant pot on top and it’s not in contact with the water.
The point is not to water the plant, but rather to let the water evaporate slowly near your plant. This raises the humidity in that location and might be useful for a Begonia brevirimosa.
If you can afford it or already have one, a humidifier will do the best job at raising the humidity to a significant level promptly.
Fertilizers
A standard liquid fertilizer can be used for a Begonia brevirimosa. I like to use a balanced, 20-20-20 fertilizer diluted to half strength and fertilize every two waterings or so. Always fertilize after watering, because fertilizer on dry soil and roots can cause fertilizer burn.
If you can get your hand on some organic fertilizer like vermiculite or fish emulsion, these are also more than appropriate. They are also generally safer as far as fertilizer burn is concerned but don’t go overboard.
Fertilize every two to three weeks and stop feeding when the growing season is over.
Propagation
It seems like the most exotic and beautiful begonias always have the easiest time propagating. The Begonia brevirimosa is no exception.
This plant is one of the rare begonias that can even be propagated by leaf cuttings! This means that you can potentially get multiple baby brevirimosas, from just one leaf.
I outline the process below, in detail, so that you can follow step by step and learn the easy process of propagating your plant.
- Choose a leaf, or two, or however many you want. Choose healthy, middle-aged leaves for the best results.
- Cut your leaf up. This might feel counter-intuitive but trust me. Cut pieces of the leaf an inch or two in size. Make sure each piece has a noticeable vein, as new roots will peek out of the veins.
- Place them all on a moist paper towel an inch or two apart and cover with another, also moist paper towel and put this in a zip lock bag.
- Keep the bag in a bright and warm spot and make sure the contents don’t dry out. The paper towels should be evenly moist but not soggy at all times.
- You should notice about an inch or two or roots in a month or two. Once you do, it is time to put your cuttings into some soil.
- Place your cuttings onto a humus-rich, premoistened growing medium, preferably one meant for baby plants. Cover the roots with soil delicately, and moisten the soil evenly.
- This is the step where you might lose some cuttings. Unfortunately, they are very fragile and can succumb to rot or just give up mid process. Try to keep the soil moist without getting the cuttings wet, and make sure the leaf is in as little contact with the soil as possible.
- You should keep your cuttings in high humidity at this point. Opt for a propagation box if you have one or enclose your cuttings in a plastic bag.
- When you notice new growth developing this means your plant has settled. Leave it be for a couple of months until it is a strong plant and you can re-pot it into the regular soil mix mentioned above.
If leaf propagation is not your cup of tea, you can also propagate your Begonia brevirimosa by stem cuttings. This is an easy process as well but here is a step by step guide:
- Choose a healthy stem with no pests or disease. Make sure it has some leaves and a couple of nodes.
- Once you cut your stem away, remove the bottom leaves if there are any, exposing at least one node from which the new roots are going to grow.
- Put this stem into the water in such a way that the stem and the nodes are submerged while the leaves are not in contact with the water.
- When you notice about an inch of roots, don’t get impatient. This is when we start adding soil to the water. We do this slowly with the intent of getting the roots used to a darker environment gradually. Doing this you will ease the shock the plant would experience if it was put directly from the water into the soil. Add about a tablespoon of soil every week or two, until the soil has completely replaced the water.
- Prepare your pot. Use a soil mix that is half growers mix and half perlite and orchid bark, this is to provide a denser environment for the roots that still need a lot of moisture.
- Plant your baby begonias in their pots and keep the soil evenly moist for about two months. New plants are vulnerable to pests and disease so keep an eye on them.
Growth
The Begonia brevirimosa grows in a shrub-like pattern. It can get up to 18 inches in height (46cm). Pinch off tips, dead flowers, and leaves to achieve a bushier plant.
Potting
Choosing a pot is an important step for taking care of your plant. You can go two different ways with pots for your Begonia brevirimosa.
You can opt for a plastic nursery container that you can then put into a decorative pot of your choice. The positive side of this option is that nursery pots almost always have many drainage holes on the bottom which is good for preventing stagnating water at the bottom.
You can also choose whichever decorative pot you like and don’t have to worry about materials or drainage. These pots are good for watering from the bottom as well, just put them in bigger containers filled with water and let the soil and roots absorb the water from below.
If you choose a terracotta pot you also have to make sure it has at least one drainage hole, but they do a better job ad moisture regulation than plastic pots.
Clay is an organic material and it absorbs moisture, which means that if you do over-water it will absorb some of it. It will also retain that moisture for longer, so be mindful of these things when planning a watering schedule for your plants.
Repotting is needed once every season or every two seasons, a good way to check is to look at the bottom of your pot and see if any roots are peeking out.
If they are, re-pot your begonia like you would any other plant. Increase the size of the pot slightly, give it new sterile soil and water thoroughly when you are done.


Begonia brevirimosa Care
Common problems with Begonia brevirimosa
Unfortunately, all Begonias are known for being susceptible to multiple diseases and pests. Begonia brevirimosa is no exception, and because of it’s high humidity requirements there is a high probability that it will get powdery mildew, bacterial leaf spot, and root rot. We get into the details of each of these below.
Powdery mildew
Powdery mildew manifests as round, white, fluffy spots on the leaves, flowers, and stems of your Begonia brevirimosa.
The tissue beneath these spots can die if left unchecked. If you already have a mold issue, remove all of the parts of the plant that cannot be saved.
Some leaves might still be in good condition if they only have a spot or two and the tissue underneath is healthy, wipe the area with a homemade mixture that has 1 tablespoon of baking soda, ½ teaspoon of liquid soap, and a gallon of water.
Like with many other issues the best way to go is prevention, and neem oil is in my opinion the best organic antifungal treatment around. It acts as a feeding deterrent for pests as well.
Bacterial leaf spot and blight
If you notice water-soaked round areas with a yellow brim, this is probably bacterial leaf spot and it will cause your plant to die leaf by leaf. The problem with this disease is that the plant gets infected systematically, so there is nothing you can do.
You should remove the plant from your other plants as soon as possible so that they do not get infected as well.
Do not put it in your compost pile as you will have a bacterial leaf spot invasion in your whole garden.
To prevent this from happening make sure that the plant you buy is healthy and avoid getting it’s leaves wet when watering.
Root rot
Pythium root rot to be exact is very common. You will notice black spots develop on the stems and petioles just above the soil and the plant slowly rots and dies.
If you manage to catch it before it’s too late you have to re-pot your plant. Take it out of the pot, discard any old soil, and hose the roots down well.
Cut away any affected roots and plant your Begonia brevirimosa in new, sterile, and well-aerated soil. You can apply a fungicide to prevent the rot from festering again.
How to keep your Begonia brevirimosa problem-free
- Give it ample but indirect light
- Do not over-water
- Do regular neem oil treatments
- Provide enough air circulation
- Do not feed in the winter
Commonly asked questions about Begonia brevirimosa
Should I mist my Begonia brevirimosa to give it more humidity?
Please don’t mist your Begonia brevirimosa and try to avoid getting the leaves wet at all costs. If you want to, you can use a damp cloth to wipe the leaves to clean away any dust or debris. Use a humidity tray, dome, or humidifier to increase humidity for your plant.
Is the Begonia brevirimosa safe for children and pets?
All Begonias are toxic upon ingestion. Keep them away from pets and children. While the top of the plant is just mildly toxic, the roots are the worst part and should not be ingested.
How to prevent powdery mildew on my Begonia brevirimosa?
The first line of prevention against powdery mildew should be providing enough airflow and avoiding getting the leaves wet. You can also use regular neem oil treatments.
Conclusion
Not so bad right? A Begonia brevirimosa will not give you more trouble than any other common Begonia. It will give you stunningly beautiful leaves though.
If you think this exotic look if worth a try, take good care of it by providing it ample light, well-aerated soil, and regular neem oil treatments.
If you already have one please show us a picture in our Facebook group, share some tips and tricks with us and let us know how your other plants are doing.