
The Alocasia cuprea originates from hot humid areas, from Asia to South America.
It has several nicknames, the most common being the “Mirror Plant” and “Jewel Alocasia”.
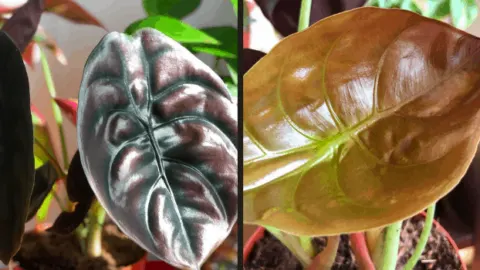
The leaves on Aocasia Cuprea are intriguing. They can be green or red. They’re stiff and they have a plastic appearance.
It’s these arrow-shaped leaves that make this Alocasia plant stand out.
The leaves create a focal point for any collection of houseplants.
In this article, you will learn how to best care for this beautiful Alocasia.
Without further ado, let’s dive right in.
[toc]

All Credit for this picture and the pictures in the featured image of this article go to @plantasticguy on Instagram! Check his profile out for more incredible plant pictures!
Alocasia Cuprea Care
For optimal Alocasia cuprea care, use well-draining coir-perlite soil. Provide bright, indirect light. Keep the soil moderately moist. Maintain temperatures between 50-85°F (10-29°C) and provide high humidity.
Soil
Your Alocasia cuprea needs well-draining soil. It’s an average plant in this care area.
Well-draining soil ensures that excess water isn’t held onto. When all that extra water doesn’t drain, the soil becomes saturated.
Saturated soil leads to several scary conditions that can kill your plant. One of the worst conditions being that of root rot (also known as wet feet).
But well-draining soil also doesn’t drain too much water. It still holds the hydration the Alocasia cuprea plant needs to thrive.
You don’t have to head out to a garden store to buy the right soil. You can make it at home, spending less than you would be buying it.
Our favorite soil for an Alocasia cuprea is a mixture of coir fiber and perlite.
Coir fiber is made from coconuts. And it works like sphagnum peat moss. But it has more nutrients so it costs a bit more than peat moss.
Coir fiber has plenty of aeration which helps excess water drain right on through. This ingredient has a neutral pH.
If you don’t want to fork over those extra few bucks, you can substitute it with sphagnum peat moss.
Perlite is mined volcanic rock, which is pretty cool. This lightweight ingredient can hold three times its’ weight in water. But it also lets go of any extra water so it doesn’t sit there.
Like the coir fiber, perlite has a neutral pH.
Light
The Alocasia cuprea plant needs indirect light to grow and remain healthy.
With that said, the best lighting conditions for Alocasia cuprea are bright, indirect light.
The stunning leaves on this plant are prone to yellow from sitting in direct light for a long time. The leaves can and will die.
Without light, the plant will lose its’ chlorophyll. When it loses chlorophyll, the green drains from your plant
There’s a strong possibility that your plant will die from losing its’ chlorophyll.
The best way for your Alocasia cuprea to get light is to place it in either an east or north-facing window.
This makes sure it gets enough light to thrive but isn’t receiving too much light.
Watering
Watering your Alocasia cuprea is simple. It’s the same as the average houseplant.
It requires an average amount of water.
This means the plant’s soil should be moist. But you shouldn’t soak it with water.
Over-watering is very dangerous for your plant. One of the biggest causes for concern from over-watering is root rot.
When the soil is thick from moisture, oxygen can’t get through.
Oxygen is as important to your plant as light and water.
Without the proper amount of oxygen, your roots can’t breathe.
The roots will begin to rot. If root rot isn’t treated right away, all the roots become rotted.
Once the roots are all rotten, your plant is done for. It’s going to die.
Like we stated, over-watering is death for your Alocasia cuprea plant. And under-watering can be as lethal.
If you’re not sure when you should water your plant, test it out. There are two simple ways to do this.
The first method involves sticking your finger into the soil. When you pull your finger out, there should be soil sticking to it. This means your plant has hydration.
If soil isn’t sticking to your finger then your Alocasia cuprea plant needs water.
The second method is similar. You stick your finger in the soil, up to your knuckle. This is about two or three inches.
If it’s hydrated soil, you’re going to feel wetness to this depth. But if the soil is dry in any area of those few inches, you need to water your plant right away.
On average, you’ll be watering your Alocasia cuprea plant two to three times a week.
Temperature
During the day, your Alocasia cuprea plant needs a temperature range of 50F (10C) to 85F (29C).
At night, the plant prefers temperatures of 54F (12C) to 65F (18C).
Humidity
An Alocasia cuprea appreciates high humidity. It needs moisture in the air, like the countries it originates from.
However, in indoor environments, providing very high humidity of 70%+ is usually difficult to achieve.
With that said, if you can provide humidity levels of 50-60%, that is already great.
Generally, to increase the humidity, make use of a humidifier.
Another method to try is the pebble method.
You fill a tray full of pebbles. Once the pebbles are in place, you fill the tray with water. The water shouldn’t go over the pebbles.
Place your plant’s pot on the pebbles.
As the water evaporates, it’s creating humidity for your plant. And since it’s so close to your plant, all that moisture is going to surround it.
Some even like to place their Alocasia cuprea plant in the bathroom.
Bathrooms are known for their humidity.
Fertilizer
The Alocasia cuprea plants are super heavy feeders. Fertilizer is an important component of a thriving plant.
Liquid fertilizer makes your job so much easier.
You can use all-purpose houseplant fertilizer, but you need to dilute it to half-strength.
Fertilize your plant every two weeks during the growing season.
But don’t fertilize your plant during the winter season. Otherwise, salt from the fertilizer will build up on the leaves of your Alocasia cuprea.
The build-up of salt burns the leaves of your plant.
Propagation
Propagating an Alocasia cuprea with a stem cutting doesn’t yield results.
Instead, you propagate through root division and in water.
Down below we’ll go into the easy steps of propagating one of these plants.
Growth
The Alocasia cuprea plant grows to be only a foot in height. The leaves can grow to be between a mere eight inches and three feet.
Potting
You need to re-pot your Alocasia cuprea plant after two years. By then your plant is mature and too big for its original pot.
The roots need to stretch out. Move your plant into a pot that’s only a little bit bigger than the original.
Spring is the best time to re-pot your Alocasia cuprea plant.
Alocasia Cuprea Propagation Steps
Propagating your Alocasia cuprea plant by root division might seem complicated.
But it’s not as hard as you think.
Sometimes your plant will grow baby plants, leaving you with little work.
We’ll take you through the steps of this process one by one. We’ll also take you through the steps of propagating this plant using water.
Using Root Division
- The first step is to remove your Alocasia cuprea plant from its’ plant pot. Be careful during the removal process. You want to avoid damaging the roots.
- Examine the roots of your plant. There will be a few different clumps of roots. You should be able to gently shake some of these baby offsets or roots apart.
- If you’re unable to get the roots you need by shaking, you can cut a clump using a pair of sterilized pruning shears. You can use 70% isopropyl alcohol to sterilize the pruning shears.
- You need to get the pot and soil ready. The pot should have drainage holes at the bottom. The soil needs to have a neutral pH. Don’t fill the pot with too much soil yet.
- Now it’s time to plant your new roots or baby offset. Again, be super gentle so you don’t injure the roots. Make sure you pack the soil around them.
- Care for your new offset as you care for the original plant. Make sure the soil is moist. Sit the plant pot in an east or north-facing window. Before you know it, you’ll have a second Alocasia cuprea.
Using Water
- For the water propagation, you’re not going to use stem cuttings like you normally do. Instead, you’re going to use root clumps or baby offsets. So, the first thing you need to do is remove your Alocasia cuprea from its’ pot. Be gentle so you don’t hurt any of the roots.
- Once you’ve exposed the roots, gently shake them. Some clumps of roots or even a baby plant should fall loose.
- If you can’t shake anything loose, you’ll need to use a pair of sterilized pruning shears. You can sterilize your pair of shears with isopropyl alcohol. Most people have this sitting in their homes. Once you sterilize the pruning shears, make a few snips. Be very careful with the roots you’re keeping intact.
- Clean any soil from the roots. You don’t want to dirty the water right away.
- You need to get a clear bowl ready. Fill it with soft tap water and don’t fill it to the top. If you have tap water with chlorine, make sure you let the water sit out for an entire day. This gets those nasty chemicals out of the water before you introduce the roots to it.
- Now you can place the roots in the clear bowl. Make sure the roots are underwater.
- Sit the clear bowl in an east or north-facing window. The light will help the roots grow and expand.
- At least once a week, dump out the old water. To add new water, let the faucet run right into the clear bowl. This aerates the water, so the roots get oxygen as well. Don’t have the faucet on full blast. Otherwise, the roots will get damaged.
- While the roots start growing, get a pot with soil ready. Make sure the plant pot has drainage holes in the bottom. And make sure you use the appropriate soil. Don’t fill the pot up with all the soil yet. It’s easier to plant the roots without all that extra soil.
- When your roots have grown three to four inches longer, you can move them to their new home. Go ahead and plant them in the pot. Be careful while you’re packing the roots into the soil. You can add the rest of the soil once you’re done.
- All that’s left is to care for your new offset like you do the mother plant. Make sure it gets the right amount of light and water.
Varieties of Alocasias
There is a large variety of Alocasia plants that you can care for with your Alocasia cuprea.
Check out these fantastic Alocasias species below.
Alocasia macrorrhiza
This plant has a unique design. The stem is long and the leaves resemble stingrays. Which is why it’s nicknamed the “Stingray Alocasia”.
Alocasia micholitziana
This Alocasia is nicknamed the “Green Velvet Alocasia”. It has fun dark green spiky leaves. The contrast of the green leaves and the white veins blows your mind.
Alocasia lauterbachiana
The Alocasia lauterbachiana plant grows tall pointy leaves. Underneath the leaves is a pretty dark purple.
Alocasia reginula
The Black Velvet produces heart-shaped leaves. Like the Alocasia micholitziana, this plant has green leaves with bright white veins.
Alocasia baginda
The Alocasia baginda plant will look great next to your Alocasia cuprea. These leaves grow to be quite big and they’re silver. The leaves look like they’re covered in dragon scales.
Common Problems with the Alocasia Cuprea
The downside to owning an Alocasia cuprea plant is that they’re prone to plant pests. There are several pests you might come across.
But there are a handful of consistent pests. The good part is that most of these plant pests are easy to rid your plant of.
Mealybugs
Mealybugs are creepy creatures. They’re covered in a cotton-like substance that acts as protection.
If they lose their cotton-like substance, they lose all the moisture in their body. So, they become dehydrated and die within minutes.
These pests get their sustenance from your Alocasia cuprea. They feed on your plant by piercing it with their straw-like mouths.
Then the mealybugs proceed to suck the sap from the plant.
The sap in a plant contains cells. These cells are full of nutrients from the plant’s soil, as well as the absorbed water.
In other words, mealybugs steal all the stuff that makes your plant thrive.
You can detect mealybugs with your eyes. You’ll see cotton fluff all over your plant.
Don’t forget to look underneath the leaves of your plant because they love to hide.
Aphids
Another pest that loves Alocasia cupreas is aphids. Aphids are annoying little pests that attack your plant.
They only grow to be about 1/4th of an inch.
Aphids feed on the sap in plants. Since the sap contains all the good stuff, aphids prevent the photosynthesis process.
With a large enough infestation, aphids can kill your plant.
With aphids, you’ll notice the worst feeding is during springtime. It goes along with their reproduction cycle.
When aphids are multiplying, more mouths are feeding on the plant.
You can find aphids feeding on underneath your plant’s leaves too.
Spider Mites
Spider mites are also common Alocasia cuprea plant pests.
Spider mites aren’t bugs. They’re arachnids and they’re related to actual spiders.
But they’re so small, you have to squint to even see them.
Nobody wants these eight-legged creeps on their plant.
Spider mites love plants that have high amounts of nitrogen, carbohydrates, and phosphorus.
When they infest your plant, they feed on it.
They suck the sap out of the plant to nourish themselves.
The most common sign of a spider mite infestation is necrotic spots. These sunken spots can be white, brown, or yellow.
There are a few ways to get rid of pests.
The first method involves spraying your Alocasia with soapy water every few days.
But if this doesn’t do the trick, neem oil is a great way to go.
Neem oil is all-natural and thick.
When you spray your plant down with this oil, the oil suffocates the pests.
You’ll need to go through with this process once a week for a few weeks. Make sure all the plant pests are gone before you stop.
Tips for an Unhappy Alocasia Cuprea
Alocasia cuprea plants are easy plants to care for. You don’t have to do anything too special to keep your plant thriving.
But they are prone to complications. Here are some tips to help you keep your Alocasia cuprea happy.
Your Alocasia Cuprea Has Yellow Leaves
Alocasia cuprea leaves turn yellow because of many conditions. But most often it’s due to over-watering your plant.
If the water is too saturated, you may have to switch out the soil. You don’t want to keep your plant sitting in a super wet environment.
You’re going to want to check the roots to be safe. When removing your Alocasia cuprea from the pot, be careful not to injure the roots.
Examine the roots for any root rot. When the root rot has taken over all your plant’s roots, there’s no saving it.
Always check the soil before you water your plant. To do this, stick your finger in the soil up to your knuckle. This is about two to three inches.
Make sure the soil is dry to the bottom of your finger before you water it.
Your Alocasia Cuprea Has Spots Between the Leaf Veins
Spots between leaf veins are a common system of Xanthomonas Leaf Spot. It’s a bacterial disease.
When your Alocasia cuprea plant sits in a wet environment for too long, bacteria are created.
These bacteria can’t penetrate your plant. But they can get inside through wounds.
Sometimes these strange spots on the leaves can turn necrotic.
You need to remove any infected leaves from your Alocasia cuprea plant. This will stop the disease from spreading to other areas.
Unfortunately, there aren’t many ways to rid your plant of the disease when it has spread too far.
You can attempt to use a fungicide but you might not get the results you want. Fungicides based in copper work the best.
Sometimes you have to throw an infected plant out. Make sure you destroy it so it can’t pass the bacteria to other plants you own.
Your Alocasia Cuprea Has Rusty Leaves
An Alocasia cuprea with rusty leaves has Rust Disease. This disease is a fungal disease passed by spores.
There are more than 5,000 known species of the fungal disease.
The disease goes through a fungal cycle. The rust lesions on your plant start as yellow or orange spots on the top of the leaves.
These yellow and orange spots spread to the bottom of the leaves in late spring.
According to the University of Nebraska-Lincoln, the next stage is cinnamon brown spots on the leaves.
These brown spots resemble a rust color. Hence, the name of the disease.
The brown spots darken to black. When the infection has gone too far, the leaves turn yellow and dry up.
After a certain point, the leaves will die.
The first step you have to take is to remove any leaves infected by the fungus. Destroy these leaves right away.
You’ll need a fungicide to treat bad cases of the disease. Bio-fungicides work well. Test the treatment first to make sure it doesn’t harm your Alocasia cuprea.
Alocasia Cuprea FAQ
How fast does an Alocasia cuprea plant grow?
Alocasia cupreas grow very slow. It takes about two years for them to become a fully mature plant.
Why is my Alocasia cuprea dropping leaves?
Dropping leaves can be from many plant conditions. However, this is common for an Alocasia cuprea. Each time they grow a new leaf, the old one drops.
Why are Alocasia cuprea plants toxic?
Alocasia cuprea plants are toxic because they have a lot of calcium crystals. Ingestion causes difficulty swallowing, drooling, and vomiting. The crystals can also cause irritate your skin if you’re not careful.
Conclusion
Alocasia cupreas are one of our favorite Alocasia plants. It’s all about the leaves.
We wouldn’t recommend this plant for a newbie. It seems like it’s easy to care for. But these plants are picky and sensitive. You have to do everything with love.