A fatal error often made by new orchid growers is watering at the first sign of wilt. The reason it is catastrophic is because orchid wilting is a sign of root rot.
There are thousands of orchid species, but there are only three different types.
- Terrestrial orchids are grown in potting media
- Epiphytic orchids have roots that act as anchors, such as attaching the orchid to trees
- Lithophyte orchids have similar aerial roots, only the anchor for this type is rocks rather than wood.
The terrestrial orchid is the one that’s grown in potting media, and it’s this one that has above and below surface roots making this type the one most susceptible to root rot.
Orchid root rot
Brown orchid roots are dying, and black roots are dead. Only green roots are healthy. When they’re not, orchid leaves wilt, blooming reduces, and eventually, the plant dies. To treat it, damaged roots need to be trimmed off. To prevent it from reoccurring, repotting needs to happen every year to two years.
The signs of orchid root rot
- Limp leaves that are soft to touch. Orchid leaves should feel sturdy.
- A lack of flowering blooms
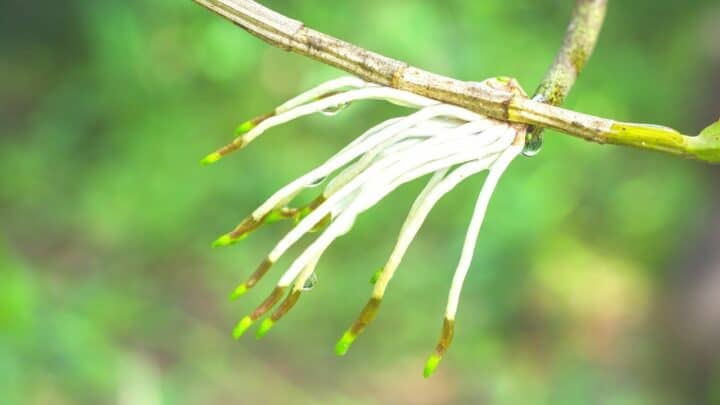
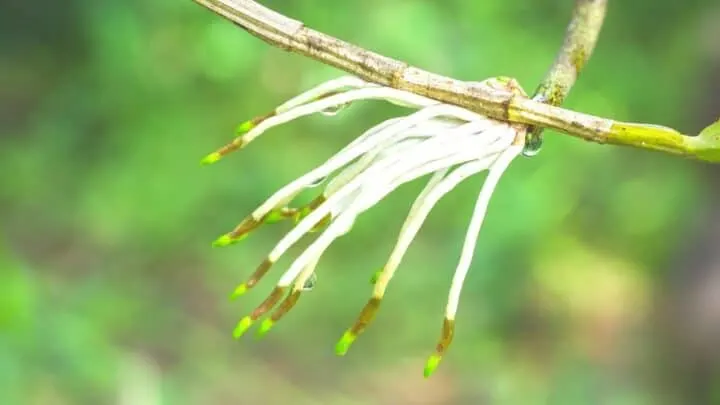
- Aerial roots that feel brittle and take on a brown discoloration Healthy aerial roots are green. When they’re white, or grey, that’s a sign of dehydration. When you see the aerial roots are bright green, it’s a sign of too much water.
- On terrestrial orchids, such as the cymbidium orchid, if you lift the plant out of the pot, rotted roots will be brown and mushy.
- If left for too long, withered roots can rot away to nothing. Terrestrial orchids with no roots can still be revived, provided there’s at least one healthy aerial root to start the recovery phase.
The causes of orchid root rot
Overwatering is the primary cause because it leaves the roots sitting in standing water.
Another culprit is the lack of airflow. It’s what leads to the overwatering problem, but sometimes, it happens because there’s next to no airflow in the potting media.
Most potting mixes for orchids are a blend of different materials. Sphagnum peat, perlite, fir bark, charcoal, and tree fern in varying quantities, such as a 50-30-20 mix of bark, peat moss, and perlite.
The thing to remember with your potting media is that the particles are different sizes. Bigger when you pot your orchids, then they get smaller as the materials break down. The more they break down, the more compact the soil becomes, reducing the airflow.
When water gets trapped between particles, airflow gets disrupted. Too much air supply being cut off causes the roots to slowly suffocate.
Lacking airflow prevents soil drying. In that respect, root rot on orchids can set in even without overwatering. It might just be the potting media that’s too densely packed, causing a similar effect as a rootbound plant shows.
How to treat orchid root rot
At the first sign of rotting roots, reach for a pair of scissors or pruners.
Any roots that are black are dead, and the brown ones are dying.
The only ones to keep are the green roots that don’t feel squishy.
Any roots that are rotting won’t recover. Cut them off for new roots to grow in.
How to revive a dying orchid
Make no mistake, when the root rot is severe, it is going to die if you don’t intervene.
When roots are so far gone that you need to cut the majority off, it will feel devastating. However, provided there are still some healthy aerial roots, your orchid has a chance.
You can save an orchid with no roots left in the soil.
Two methods to save a dying orchid with no roots
Sphag’ and bag
This is the easiest, but it’ll take at least one month before new roots establish.
The only three things you need are
- A clear plastic bag (perforated plastic Polly pocket sleeves are ideal)
- A small amount of sphagnum moss
- A little hydrogen peroxide 3%, or a similar product to coat the inside of the bag to prevent mold spores forming.
How to use the sphag’ and bag method
Spray a fungicide over the inside of the Polly pocket, or whatever sealed bag you’re using, such as a bread bag or Ziploc bag.
The humidity is going to get extremely high with very limited airflow. That’s a breeding ground for fungal spores so you’ll want to spray something in there first to prevent fungal spores from developing.
Moisten the sphagnum moss and place just a small amount in the bottom corner of the bag. It shouldn’t be soaking wet. Just wet enough for a slight drip when you squeeze it.
On the other side of the bag, place your orchid plant there.
Don’t let them be in direct contact or the entire plant will rot. The purpose is to raise the humidity levels around the plant. Not to increase moisture directly.
Seal the bag and leave it be. Within a month, you should start to see new roots emerge.
Repot in fresh potting media
You can skip right ahead and pot up your orchid in fresh potting media, even with no roots to anchor it.
When there are no roots, tie it to a stake, such as a chenille stem (stem pipe) to hold it in place in the pot.
To tie it on, use something that doesn’t retain moisture, such as a plastic cable tie, rather than twine or cotton string.
The principles are the same as the sphag’ and bag method, only you’re not putting it in a bag. A thin layer of sphagnum moss (about an inch) gets laid over the orchid potting mix to increase the humidity.
The higher the humidity encourages root growth. It’ll take a bit longer, but the advantage is that once they grow in, they’ll grow into the potting media.
You won’t need to stress the plant by growing it in what’s essentially extreme humidity, then changing the growing conditions suddenly, which can lead to more problems.
How to prevent orchid root rot
Orchid root care revolves around ensuring the potting media can always dry as fast as possible.
That requires attention to two areas, the size of the pot and potting media.
The size of the pot
Roots need room to grow, but since they aren’t huge, you only need to increase the pot size by an inch or so each time the plant starts to show signs of becoming rootbound.
It’s preferable to repot orchids every year to two years at most.
Keeping the potting media fresh
Rarely will an orchid potting mix provide sufficient nutrients after two years. The materials are organic so their composition breaks down.
If you don’t replenish the potting media with fresh potting mix that provides sufficient drainage, aeration gets affected.
The lack of airflow will contribute to root rot because of the finer particle sizes.
Frequently Asked Questions related to orchid root rot
When is the best time to repot orchids?
The best time to repot orchids is after flowering. But, that’s only a guideline. If you notice wilt and signs of rot before that, your orchid won’t flower so you will have to repot it earlier to keep it alive.
Is an orchid with no roots always salvageable?
The only time you can revive a dying orchid is when there’s at least one healthy root on the plant. It doesn’t matter if it’s an aerial root. It serves the same purpose. If all the roots (above and below the soil line) are black or brown, the orchid won’t recover.


Daniel has been a plant enthusiast for over 20 years. He owns hundreds of houseplants and prepares for the chili growing seasons yearly with great anticipation. His favorite plants are plant species in the Araceae family, such as Monstera, Philodendron, and Anthurium. He also loves gardening and is growing hot peppers, tomatoes, and many more vegetables.