
Amaryllis plants can produce new bulbs every year under the right circumstances, naturalizing them into thick states.
Over the long run, an excessive number of bulbs can smother one another by becoming crowded underground.
Plants such as lilies, hosta, daffodils, and many others can have their congested bunches divided up and revitalized if they are spaced apart.
Your plan for the bulbs will determine when to part with amaryllis plants.
Amaryllis can be forced into sprouting for preseason and fall by taking them from the garden.
Although generally isolated in the harvest season (October and November) or February and March in hotter climates, garden amaryllis plants are grown daily year-round.
Planting amaryllis plants in the open air during such times will allow them to go through their regular torpidity period.
So, let’s see below how exactly we can separate amaryllis bulbs from the plant without doing any damage.
How to Separate Amaryllis Bulbs
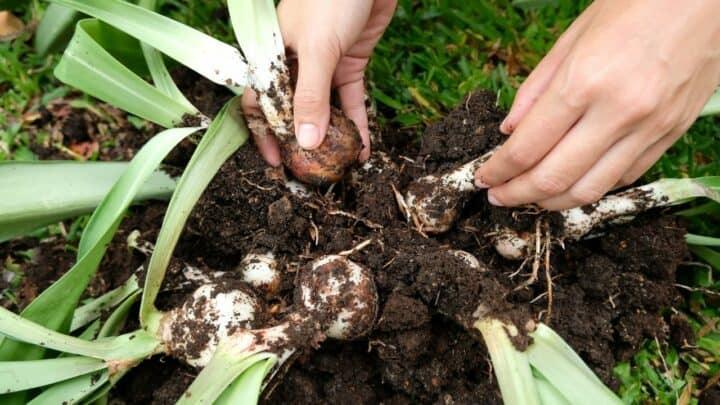
To divide amaryllis bulbs, prepare their new container first and the amendments to the soil if there’s any need. Make sure the soil’s pre-soaked for 24 hours for easier burrowing. Then, slowly remove the stalks and leaves from the bulb with a garden spade. Then, lift the bulb cluster with a garden fork.
Dividing Amaryllis Bulbs in a Garden
Before you start separating your amaryllis bulbs, install a new site or container first. Add soil or make soil changes to minimize relocate shock.
Bulb growers or drills can be used to prepare the opening for burrowing.
When winters are dry in a region, it is very likely that the planting site will require soaking deeply 24 hours prior to burrowing so the soil will be more easily worked.
The amaryllis also needs to have all the stalks and foliage removed now. The encircling circle of amaryllis bulbs should be cut with a sharp garden spade.
A couple of inches (8 cm.) is sufficient distance from the bulbs while cutting down deeply into the soil.
You can then delicately lift the bulb cluster out of the ground using a garden fork; numerous gardeners prefer to use this technique.
The Best Time To Separate Amaryllis
During October through mid-November or during late February through mid-March, amaryllis may require isolation.
Ensure that the bulbs are not simultaneously damaged as you lift them. Attempt to connect as many roots as possible to the bulbs.
In addition to not slicing into the roots, a garden fork is a good tool. Put the smaller bulbs in separate heaps from the larger bulbs.
Leave solid, green foliage connected while trimming out any yellow foliage.
Make a move to turn the dirt while the bulbs are out, and then incorporate some fertilizer or stale compost to improve the soil.
Put the bulbs in a damp place, placing them in an obscure region, and covering them, so the roots will not dry out.
Digging Amaryllis Bulbs
Amaryllis plants are delicate and should be lifted in fall before a hard freeze executes the bulb.
How early you lift them relies upon whether you are attempting to time their blossom. For occasion flowers, you’ll dive bulbs in mid-August.
Frequently pot up new bulbs on schedule for occasion blossoms and make the most of the more established amaryllises later in the colder time of year, basically on the grounds that I don’t consider lifting them during the summer.
Additional Tips in Growing Amaryllis Bulbs
Store the bulb in a cool, and dry spot for at least two months; longer is fine.
Then, from there, around two to six months before you need the amaryllis to blossom once more, repot the bulb in crisp gardening soil and place it in brilliant, circuitous light.
Resume watering — sparingly from the start. When you see new development, increment watering and anticipate the forthcoming bloom show.
By following these fundamental consideration rules, you will actually want to urge your amaryllis to blossom for a longer time.
Propagating Amaryllis Through Cuttings
You can likewise proliferate amaryllis via cuttings. Do this step during midsummer and fall (July to November).
Select bulbs that are at any rate 6 inches (15 cm.) in breadth and cut them in an upward direction into (at least four) pieces, contingent upon the bulb’s size—bigger parts ordinarily grow faster.
Each part ought to have at any rate two scales. Apply fungicide and afterward plant them with the basal plate looking down.
For cutting-developed plants, cover 33% of each piece with the wet soil. Place the holder in an obscure region and keep it damp.
In around four to about two months, you should start to see little bulbs shaping between the scales, with leaf sprouts following presently.
Planning For Next Year’s Amaryllis Blossoms
Amaryllis can be urged to bloom again the next year. It takes a little arranging and additional consideration yet is very fulfilling if you’ve done it successfully.
After the flowers have blurred, slice the blossom tail to the inside 1 inch of the highest point of the bulb. Proceed to water and take care of the plant routinely with fluid houseplant manure.
Amaryllis will grow various leaves throughout the spring and summer. This will aid the plant produce the energy needed for the next year’s blossom.
In mid-August, start retaining water and let the foliage bite the dust back normally as the pot dries out totally.
When to Stop Watering Amaryllis
Before the fall season, bring your amaryllis inside and place it in a bright spot. If you’re not sure what a bright spot really means, you can read more about light levels to guide you.
After which, quit watering and taking care of it.
The leaves, flowers, and stems will start to blur. Whenever they have yellowed, cut them off and move the plant to a cool, dim spot with temperatures between 54-60 degrees.
The bulb will require in any event 7-10 weeks of rest. After the rest time frame, move it to a warm, bright spot and water completely.
Following the 7-10 week exposure in a warm and bright spot, it should start to sprout once more.
Conclusion
No matter how much knowledge and how ideal the conditions are, gardening is a gamble. I’m confident yours will succeed if you follow the steps described here.
To complement winter seasonal decor, select bold reds and brilliant whites.
For a warm garden scheme planted outdoors, use oranges and peaches in a range of shades from bright to soft.
A dramatic announcement of its arrival will be made with its statuesque scapes and bold trumpets, spring or winter.


Daniel has been a plant enthusiast for over 20 years. He owns hundreds of houseplants and prepares for the chili growing seasons yearly with great anticipation. His favorite plants are plant species in the Araceae family, such as Monstera, Philodendron, and Anthurium. He also loves gardening and is growing hot peppers, tomatoes, and many more vegetables.