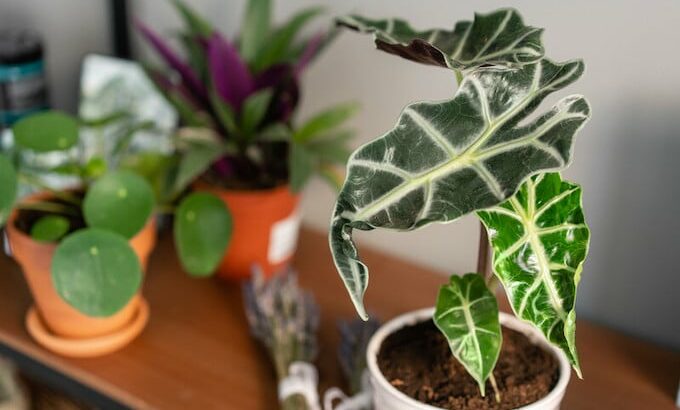

Alocasia Polly Care
To care for Alocasia Polly choose soil that is well-draining and maintains moisture well such as a peat-based mix. Provide bright indirect light. Direct sunlight should be avoided in order to prevent sunburn. The temperature should be between 64-79°F (18-26°C). Water regularly about once a week and keep the top 2-inches of soil slightly moist. Provide high humidity of 60% or above. Fertilize once a month in spring and summer using a liquid fertilizer at half-strength.

Alocasia Polly Care
Alocasia Polly Care Guide
A slightly fussy plant, get the basics right and you will be rewarded in abundance. This plant might not be one for the novice collector.Soil
The Alocasia Polly requires optimal soil conditions in order to thrive. It needs to be able to maintain moisture within the soil. Think about where the Alocasia grows in the wild. It is found in tropical or sub-tropical moist environments to be precise. So, you’ll need to either buy or create something that replicates this. Use a well-draining potting mix. A quick drain peat mixture will usually do quite well. Whilst maintaining moisture is important for the Alocasia Polly, you’ll need to be careful it doesn’t get too wet. The soil should be damp to the touch, but not soggy. If you see water pooling in the soil that’s a bad sign. You either have badly draining soil or need to ease up on the watering. Make sure your pot or container has a hole or 2 in the bottom for adequate drainage. If you suspect it is the soil content that is causing your drainage problem there are a few things you can do. Line the base of your pot with coco coir or mossy peat before adding the rest of the potting mix. You can also actually use compost which is marketed for flower growing too that will do just fine. When placing the plant within the soil do not push it too far down -leave some room above the surface for it to grow. Ideally, the roots should be found just under the soil line so they have enough space to grow down.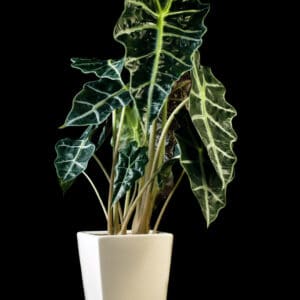

Alocasia Polly Care
Light
Provide bright indirect light coming from an east-, west or north-facing window. This plant is not a fan of direct sunlight. Direct summer sunlight should generally be avoided as this will cause the leaves to burn. You should keep your leafy friend in a shaded spot. In times when light is low (mainly in winter) you can increase the hours of sunshine that your plant is getting by suppling artificial light using a grow light.Watering
You find Alocasia Polly plants in damp, humid environments. If kept as a houseplant, you should try to mimic this environment as good as possible. In terms of watering your Elephant’s Ear plant, this means that you should make sure that the soil is constantly moist. On top of that, misting your plant on a regular basis is recommended. Not drought tolerant, Alocasia Polly to be watered on a consistent schedule. Avoid pooling water in the plant when watering, as it can be prone to fungal infections and root rot.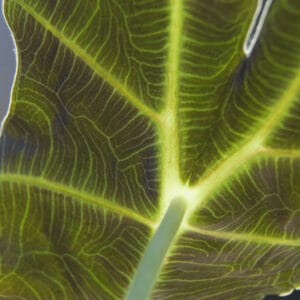

A backside of an Alocasia Polly leaf
Temperature
The best temperature for an Alocasia Polly lies between 64-79°F (18-26°C). Alocasia Polly can thrive at room temperature. Too cold temperatures should be avoided, as this can cause your plant to fall into dormancy. Temperatures below 50 Fahrenheit (10 degrees Celcius) should be avoided whenever possible.Humidity
Alocasia Polly is very fond of high humidity of 60% or more. One way to crank the humidity up is to put your Alocasia on a pebble-filled tray of water. Given Alocasia’s origins in sub-tropical climes, humidity is its friend. If you struggle with this – maybe in the winter months when the indoor air gets quite dry with radiators and heating systems, make use of a humidifier.Fertilizer
Alocasia Polly does not have any special fertilizer needs. As with many other houseplants, feeding the plant once a month in spring and summer with a liquid fertilizer at half-strength will be sufficient. In winter, feeding your Alocasia won’t be necessary. If you do feed in winter though, do make sure that you do so sparingly like every 2 months at max. No fertilization is required in the first year after purchase or repotting Alocasia Polly.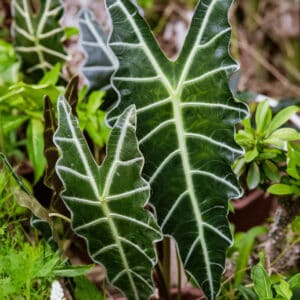
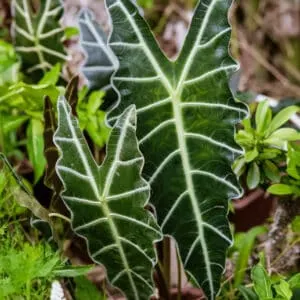
Keeping Alocasia Polly leaves great looking is quite a challenge
Flowering
The Alocasia Polly does, on occasion, flower. It’s quite an interesting looking sight, as the plant does not usually look like it’s a flowering variety. The opinion is split amongst Alocasia enthusiasts about flowers. Whilst it is absolutely natural, many prefer to remove any signs of potential flowering. They do so in order to protect the leaves. For a plant that is often purchased for adorning homes with beautiful foliage, this may make sense. Often, due to the energy required to produce a flower, some of the leaves will take a hit. They may fall off or look damaged, yellowed or withering. If you let your Alocasia Polly bloom, however, you’ll get to see quite a strange-looking flower. Initially, it looks like a tall leaf with a pod at the bottom, different in type from the ones on the main plant. Eventually you will see a white tip forming inside it, and the process is complete. The white tip is the spadix – basically a collection of tiny “flowers”. Once the “leaf” or spathe opens to reveal the spadix the process is complete. The flower will generally last a month. Then, it will dry up and eventually fall off. At that point, it doesn’t look so pretty. You can decide for yourself if you wish to let the plant flower or not. There is no harm for it, and it looks pretty nice, if not like a traditional flower. You’ll probably just think it is a leaf at the beginning anyway. If it blooms, try not to let it pollinate.Propagation
As far as propagating Alocasia Polly goes, your best bet is propagating by rhizome division. Newly divided Alocasia plants are susceptible to numerous diseases such as root rot. Proper watering and the right choice of soil are key to ensuring that your freshly divided plants will thrive and stay healthy.Growth
Alocasia Polly can grow up to about 20 inches (50 cm) in both height and width. The speed of growth of this leafy friend is moderate. If you would like to get an Alocasia that gets far bigger than Alocasia Polly, you might want to get your hands on an Alocasia Macrorrhizos. This very species grows up to 4 meters high (!) and features leaves that can get as big as 1 square meter!
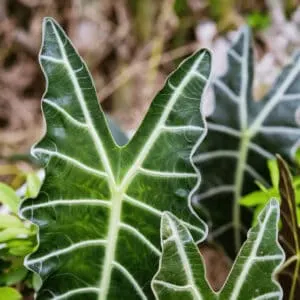
The lobes or ears of Alocasia Polly are quite spectacular
Potting
Alocasia Polly requires repotting every year or two. So when should you report? As with many other houseplants, the main reason for repotting is the circumstance that your plant will outgrow its pot (and become root bound). As far as the size of the container goes, you will want to make sure to choose a pot that is big enough to accommodate your plant’s root system.Propagation of Alocasia Polly
The best way to propagate your Alocasia is by rhizome division. As a general rule, it is pretty easy to propagate Alocasia Polly. Other easy plants to propagate are, for instance, Pothos, Monsteras, and ZZ plants.Please note that your Alocasia must have reached a certain size before you can go on and propagate your plant.
The root system of very young plants is not fully developed yet, so propagating too early is doomed to fail.
So how to propagate Alociasa x Amazonica by rhizome divison? As the Alocasia is grown from a rhizome, you can simply propagate it when repotting it (best done in spring). Here are the necessary steps to propagate your leafy friend: 1. To carry out the rhizome propagation, carefully remove the arrow-shaped leaf from the container 2. Now shake the soil off your Alocasia and divide the rhizome into several pieces (it depends on the size of the rhizome how many pieces you can get here. 3. Make sure to let the freshly cut rhizomes dry a little before continuing. 4. Then you can plant the rhizomes in (a) new pot(s). Make sure that the top part of the rhizome is actually planted above the soil. As far as the soil mix goes, a mixture of peat & sand is recommended. Attention: Important factors when propagation your Alocasia are warm temperatures and a high level of humidity. If fresh shoot tips appear, you can assume that the root division has been successful.Meeting the water requirements of Alocasia Polly
The right water
What kind of water does my Elephant’s Ear like most? Alocasia Polly is not very fond of hard tap water. It is better to use either rainwater, distilled water, or filtered water to make sure your plant thrives as expected.The right amount of water
Underwatering your leavy friend might lead to your plant wilting. Too much water, on the other hand, could result in root rot. As always, it is therefore key to ensure that your Alocasia gets the right amount of water. So, what is the right amount of water then, please? Alocasia Polly likes to receive quite a lot of water. Especially in summer when the plant is actively growing, make sure to keep the soil moist at all times (watering almost every day is not uncommon for Alocasia Polly on very hot summer days. In winter, Alocasia Polly needs much less water. However, even at this time of the year, you need to make sure that the soil never completely dries out. A good way to determine whether watering is necessary or not is to check the weight of the pot. A waterless pot is of course much lighter! You might also want to get yourself a nice water meter to make sure that your leafy friend always gets the right amount of water. Finding a good water balance is absolutely crucial for the well-being of your Alocasia.Common problems exhibited by Alocasia Polly
Brown patches on the leaves
Brown patches on your Elephant’s Ear are usually a sign of too much sunlight (sunburn). Take your plant out of direct sunlight. Move it to a more shaded spot.Alocasia Polly leaves turning yellow
If house plants have yellow leaves, this is usually due to incorrect watering. The problem is, and this is also true in our specific case here with the Alocasia Polly, that this is a sign of either too much or too little water. So try to find out whether you are giving too much or too little water. Generally speaking, Alocasia Polly needs quite a lot of water. Especially in summer when in full growing mode, you absolutely need to make sure that the soil keeps moist (but not too wet/soaked!) and you should water almost daily. In colder months (mainly in winter), decrease the level of watering and let the soil dry out a little bit more. However, the soil should never be completely dry.Mealybugs
What is the cause for mealybugs on your beautiful indoor plant? Well, as if it would be that easy. In fact, there are many different causes for mealybugs on houseplants such as contaminated potting soil, overwatering & overfertilizing. It might also just as well be that you brought home a new plant that had already mealybugs on it or maybe you just granted your houseplant some additional sunshine in summer by putting it in the garden for some time… Whenever you are dealing with mealybugs, the first thing you should do is to isolate your plant. Put your darling in quarantine and then tackle the problem. The most common method to get rid of mealybugs is by removing them by hand using a cotton swab dipped in alcohol. Repeat this routine for a couple of days until the problem is finally under control. Often, though, this is easier said than done. Mealybugs are a real nuisance!Spider mites
At an earlier point in this article, we have already pointed out how important the right watering routine is for your Alocasia. I can’t really stress this enough, as Spider mites are another annoying problem that comes with inadequate watering of your Alocasia Polly. Spider mites are almost always a sign of not underwatering because spider mites generally just thrive on houseplants that are too dry. Check your Alocasia Polly for badly infested parts and remove them immediately. Now, to get rid of the rest of these little pests, there are several methods that can be applied. One proven way to get rid of Spider mites is to use a plant-based miticide (spray!). You could, for instance, use Pyrethrum or Rosemary oil (a solution of Rosemary oil and water). To avoid future infestations of spider mites, keep the humidity high, make sure that the soil and also the leaves are not too dry, and regularly mist your plant using a spray bottle.Alocasia Polly – Top 5 Care Tips
It’s obviously hard to get everything right as far as Alocasia Polly care goes. However, that’s usually not much of a problem as long as you get the care basics right. Focus on getting the following 5 care aspects right and your Elephant’s Ear should just do fine!- Soil: This is one of the most crucial elements in your plant’s care. Make sure you have a well-draining, peaty soil. In our “soil section” we go into a lot of detail in how to do this. Don’t skimp on purchasing the right mix for your Alocasia Polly – you’ll likely regret it
- Water: Water regularly and consistently. The Alocasia Polly likes to be kept in a moist environment but NOT soggy. Follow our watering tips in the guide.
- Humidity: This is a tropical plant, and enjoys humidity. If you struggle with this, particularly in winter, then mist the plants leaves daily or even buy a humidifier
- Temperature: This plant doesn’t like the cold. Keep it above 60 degrees Fahrenheit and it will be happy enough
- Light: The Alocasia Polly likes indirect sunlight. Be careful with direct sunlight – this will burn the leaves.
Frequently Asked Questions About Alocasia Polly
Is Alocasia Polly safe for cats?
Is Alocasia Polly safe for dogs?
Where can I purchase an Alocasia Polly?
What are the different names of Alocasia Polly?
Is it Alocasia Poly or Polly?
Is Alocasia Polly a suitable houseplant for beginners?


Daniel has been a plant enthusiast for over 20 years. He owns hundreds of houseplants and prepares for the chili growing seasons yearly with great anticipation. His favorite plants are plant species in the Araceae family, such as Monstera, Philodendron, and Anthurium. He also loves gardening and is growing hot peppers, tomatoes, and many more vegetables.