
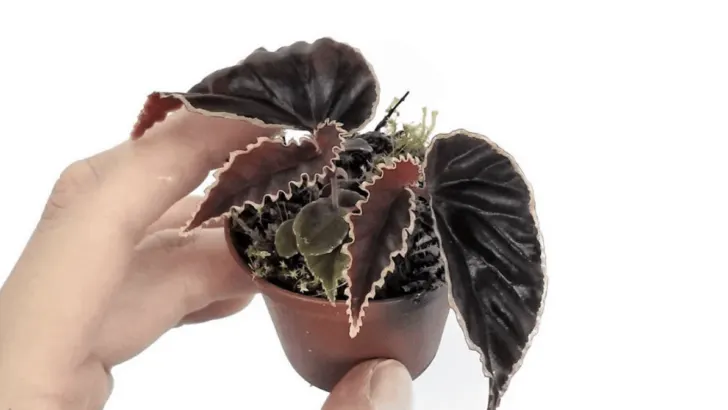
The Begonia darthvaderiana plant is named after Darth Vader. Yes, it’s named after Darth Vader.
This is because of the beautiful dark brown or black leaves the plant produces. And we can’t forget the gorgeous red flowers.
The Begonia darthvaderiana plant wasn’t discovered until 2014.
It was discovered on the island of Borneo. You can find Borneo in the South China Sea.
If you’re lucky enough to find one of these Begonias, you don’t have to stress over caring for it. It’s simple and not much different than other indoor Begonia species.
We’ll review all the essential aspects of caring for the Begonia darthvaderiana plant next. Enjoy.
Table of Contents
Begonia Darthvaderiana Care
For thriving Begonia darthvaderiana care:
Soil: Choose well-draining soil with sphagnum peat-moss, perlite, and coarse sand mix.
Light: Provide partial sunlight, avoiding direct sun to prevent leaf damage.
Watering: Keep soil moist but not soaked; over-watering can lead to root rot and fungi.
Temperature: Maintain 70-75°F (21-24°C), avoiding extremes.
Humidity: Ensure high humidity; use a humidifier, mist leaves, or employ the pebble tray method to create moisture in dry environments.
Let us now have a more in-depth look at all the various care aspects of Begonia Darthvaderiana.


Soil
You need to use well-draining soil for your Begonia darthvaderiana. Like most Begonias, this species needs a perfect balance.
Well-draining soil prevents you from over-watering a plant. It’s so easy to do, and it’s nice to have something that stops you from making that mistake.
This type of soil allows all extra water to drain through the soil. But it still holds onto enough moisture for a happy plant.
You’ll still need to use a plant pot with drainage holes. Otherwise, the water will stand at the bottom of the soil. This will rot your roots until there’s nothing left.
Some people prefer to use only sphagnum peat-moss for their Begonia’s soil. This is a great choice.
If you’re struggling with enough water, you may want to add ingredients that hold moisture.
You can make well-draining soil using:
- Sphagnum peat-moss
- Perlite
- Coarse sand
Light
The Begonia darthvaderiana plant needs partial sunlight. This means indirect sunlight.
Direct sunlight is damaging to this plant. It can leave ugly marks on the leaves you can’t get rid of. Or it can even scorch the leaves until there’s nothing left. Always avoid leaving it in direct sunlight at all costs.
To create partial shade for your plant, only place it in a window during the morning sun. This should be either a north or east-facing window.
Once morning is over, place your Begonia darthvaderiana plant in a more shaded area of your home. This way, it gets an equal balance between indirect light and shade.
Watering
A Begonia darthvaderiana plant needs moist soil. It needs plenty of hydration to survive and thrive.
But you must avoid over-watering. Over-watering this Begonia can cause a variety of issues, including fungi and root rot.
When you saturate the soil with water, oxygen can’t get through the soil. So, the roots of your plant aren’t getting the oxygen they need to grow.
This leads to the roots rotting away. And the process happens quicker than you realize. The worst part is it’s hard to diagnose without completely digging up the plant to eye the roots.
If only a few roots have rotted away, feel free to trim those bad roots. Switch out the saturated soil to fresh moist soil. But if all the roots are rotten, there’s nothing more you can do.
Begonias are also prone to fungi. Once the spores spread, the fungus will take over your plant. Different fungi are very difficult to remedy.
To prevent over-watering your Begonia darthvaderiana, check the soil. Stick your finger into the soil up to your big knuckle.
When these few inches of soil are dry, it’s time to water your plant. When these few inches of soil are still moist, check it again in a few days.
Temperature
The best temperature range for Begonia darthvaderiana is between 70F (21C) and 75F (24C).
You don’t want the temperature over 80F (27C). This can cause wilting and stunted growth.
Avoid cold temperatures at all times. The Begonia does not do well in the cold. And frost on the leaves can harm it.
Humidity
Humidity is an important factor for all Begonias, including the Begonia darthvaderiana. For a lush and thriving plant, you’re going to want to make sure there’s plenty of humidity in your home.
In most cases, you have to create humidity, especially if you live in an area with dry air.
This is pretty easy to do. The easiest way to create humidity is by using a humidifier. But if you don’t already own one, these machines can be pricey.
One popular method is to spray the leaves of your plant down from time to time. When the water evaporates, it creates moisture in the air. This moisture goes straight to your Begonia.
Another great method is the pebble tray method. All you need is a tray, plenty of pebbles, and water.
You start by filling the tray to the very top with pebbles. Place the smoothest pebbles at the top of the pile.
Next, fill the tray with water. Make sure the water doesn’t flow over the pebbles. It should sit right beneath.
Now, you place your plant on the tray. When the water evaporates, that moisture goes to your Begonia darthvaderiana plant.
Once the water gets low, you only have to fill it again.
Fertilizer
During the growing season, you should fertilize the Begonia darthvaderiana once a month.
But during the cold season, don’t fertilize this plant. It’s more vulnerable and the salt can burn your plant.
Orchid fertilizer works best. You can’t go wrong using this type.
Propagation
Propagating a Begonia darthvaderiana plant is different than most plants. You can propagate through division or leaf cuttings.
We’ll learn how to go through both propagation processes down below.
Growth
The Begonia darthvaderiana plant can grow between a foot and a foot and a half in height.
These plants don’t get very big. But they produce plenty of leaves.
Potting
Re-potting a Begonia darthvaderiana plant is the same as re-potting other Begonias.
You’ll want to re-pot the plant every year to two years. You’ll know by checking the drainage holes on the bottom of your plant pot. The roots will start to overtake the soil and grow through the bottom.
It’s important to re-pot as soon as you notice this starting. Otherwise, your roots will stress out. This will stunt your plant’s growth. It also makes it more susceptible to plant pests and diseases.
Begonia Darthvaderiana Propagation Steps
Propagation is a fun process, no matter which method you use. You get to use a plant or create a whole new life. There’s nothing more exciting in the plant world.
When it comes to the Begonia darthvaderiana plant, you have to major methods.
The first method involves root division. The second involves leaf cuttings.
Using Root Division
To propagate Begonia darthvaderiana through root division, follow these steps:
- The first step you need to take is to dig up the original Begonia darthvaderiana plant. While you’re doing this, make sure you’re super careful. Roots are very fragile, and it doesn’t take much pressure to tear them.
- Wash away the dirt from the roots. You can use a faucet to do this, but make sure the water isn’t on full force.
- Once you’ve washed all the dirt away, you can see the roots. Some roots are easy to divide with your hands. But with the more difficult roots, you will need a sterilized knife. You can use isopropyl alcohol to sterilize it.
- If there are any bad roots, make sure you remove them. You’ll want to use a sterilized knife or pair of pruning shears to do this. Dead roots can kill the other roots they’re connected to.
- Sit the roots on a paper towel and let them dry out. You don’t want to plant soaking wet roots.
- While the roots are drying, get the plant pot ready. Make sure you use well-draining soil. The plant pot should have drainage holes at the bottom to let the excess water drain.
- Go ahead and plant the new roots into the plant pot. Make sure the roots are completely covered in soil. Be careful so you don’t harm the roots during this process.
- Now you’re going to take care of your new plant like you do the original. Make sure it’s getting indirect bright light during the morning. Then, switch it to partial shade. Keep the soil moist.
Using Leaf Cuttings
To propagate Begonia darthvaderiana through leaf cuttings, follow these steps:
- Find a great leaf cutting to propagate a Begonia darthvaderiana. You need a leaf cutting with still about three inches of the petiole attached. You’ll want a pair of sterilized pruning shears to get your leaf cutting. You can sterilize your pruning shears with isopropyl alcohol.
- Once you have your leaf cutting, dip the cut end in a rooting hormone. This will help ensure that a new plant starts. It also boosts the rate of growth.
- Get your plant pot ready. The plant pot should have drainage holes at the bottom so the water doesn’t stand. Make sure you use well-draining soil with sphagnum peat moss.
- Plant your leaf cutting. You don’t want to stick the cutting standing straight upright. A 45-degree angle works best. You can use your finger to create the perfect-sized hole. Place your leaf cutting into the hole you created. Pack the soil around the cutting tight.
- You’re going to need plastic wrap for this next step. Cover the leaf cuttings with the plastic to protect them while they grow. This holds the moisture to the cuttings. Use tape to hold the plastic to the leaf cutting.
- Let the leaf-cutting take root. It takes about four weeks for the leaf-cutting to take root. A few new leaves should have popped up by then as well. Once there are new leaves, you can remove the plastic wrap. The leaf cutting should now be a stronger plant.
- All that’s left is to care for the new plant. Make sure it’s getting bright indirect sunlight and partial shade. The soil should be well-draining, and it should always be moist.
Other Varieties of Begonias
Begonias are wonderful plants. They create the prettiest flowers and leaves. And there is so much more than the Begonia darthvaderiana plant.
Here are a few of our favorite Begonia species:
Begonia boliviensis
The Begonia boliviensis plant reminds us of Christmas. It produces gorgeous red flowers with spiky dark green leaves.
Begonia reiger
This Begonia plant is one of our favorites. It brings beauty into any room. The flowers are a pastel yellow with pink edges.
Begonia rex
This Begonia rex doesn’t create leaves. But it does create the prettiest spiky leaves. These leaves are pink on the inside with a cool green edging.
Common Problems with the Begonia Darthvaderiana
Some plant pests gravitate towards the Begonia darthvaderiana plant. But don’t panic. These plant pests are easy to rid your plant of.
Spider mites are one big plant pest that loves Begonia plants. Spider mites are arachnids. They have eight legs and look like small spiders. They can be hard to see with the naked eye.
Place a piece of white paper under the plant to check if you have a spider mite infestation. Gently shake the plant. The spider mites will drop onto the paper. They’ll look like tiny little black dots.
Spider mites feed off the sap from inside your plant. This sap has important cells. These cells carry both nutrients and hydration to the rest of the plant. This aids in the photosynthesis process.
These plant pests can damage over ten cells in a minute. And they multiply fast. So, you want to treat a spider mite infestation right away. Or your plant will pay.
Whiteflies are another common plant pest for the Begonia darthvaderiana plant. This plant pest has wings.
If you shake your plant, they’ll try to fly away. But their wings are thin and won’t get them very far.
They live for the sap inside of a plant. They can leave tiny little bite marks from where they have fed.
But the biggest problem with whiteflies feeding is their toxic saliva—the toxins in their saliva lower turgor pressure. Turgor pressure is the force inside a cell.
Lowering the turgor pressure means the cell walls are coming in. This leads to your plant shriveling away into nothing. Eventually, the plant will die.
Getting rid of these pests doesn’t take much. Our favorite method involves using neem oil. It’s all-natural, but you should still test a small area of your plant to ensure there’s no reaction.
You want to dilute the neem oil with water. Mix the two liquids in a spray bottle.
Spray your plant down with this mix. The heavy oil will suffocate the pests almost right away. Then all you have to do is wipe the dead pests from your plant.
You should recheck your plant a few days later to ensure no new pests have popped up. You never know where eggs could be hiding. If there are any pests, treat your plant one more time.
You can’t always keep any plant happy. This includes the Begonia darthvaderiana plant. You can try your hardest, but problems come up.
Here are the most common issues you’ll face with this Begonia.
Your Begonia Darthvaderiana Plant’s Leaves are Turning Yellow
When the leaves on a Begonia darthvaderiana plant turn yellow, you’re over-watering it.
If this is the case, you’ll want to check the roots to be safe. Over-watering blocks oxygen from getting to the roots of your plant. This leads to the nasty condition of root rot.
Once all the roots of a plant are rotten, there isn’t much you can do to save it.
You’ll be able to tell by looking at the roots whether your plant has root rot.
When the water is too saturated, you’ll need to switch out the soil. Otherwise, your plant is going to continue to sit in all that water.
Always check the soil before you water it. Stick your finger into the soil to your big knuckle. This is about two inches deep.
If the soil is dry, it’s time to water your plant. If the soil is still moist, wait another day.
Your Begonia Darthvaderiana Plant Has Strange White Spots
If a Begonia darthvaderiana plant has white spots, this is a sign of too much sunlight.
We stated earlier that this Begonia is susceptible to scorch marks from sunlight. Plus, it needs partial shade as well as indirect sunlight.
If your plant is sitting in a window, move it away from it. If it’s sitting under artificial lights, move it a few inches away.
Make sure you aren’t leaving it out in sunlight for too long. Morning light is fine but once the sun gets stronger, move your plant immediately.
You can’t fix scorched leaves. If you’re worried about aesthetics, remove the damaged leaves.
Your Begonia Darthvaderiana Plant Has Sooty Powder
A Begonia darthvaderiana plant with sooty powder has mildew. This is from over-watering.
This is why we always repeat that you should check the soil before you water any of your plants. Over-watering is the easiest thing to do, but it’s also the deadliest.
According to the University of Mississippi, the sooty mildew or mold won’t be what kills your plant. It’ll be the plant pests it attracts.
The first step you should take is to remove the affected leaves. Otherwise, the mildew will spread fast. You need sterilized pruning shears to remove these damaged leaves. Isopropyl alcohol is perfect for sterilization.
Once the bad leaves are gone, you need to switch out the soil. It’s saturated. And your plant is going to continue to sit in that water, so the fungus will never go away.
You want to consider using a fungicide. But keep in mind these sprays are full of chemicals. Chemicals can take a toll on a plant.
So, always test a small area of your plant before you use a fungicide.
Begonia Darthvaderiana Frequently Asked Questions
How long does it take for the Begonia darthvaderiana to start to sprout?
It takes about four to six weeks for the Begonia darthvaderiana plant to start to sprout. But if your Begonia is in a cold environment, it can take longer.
Can I use a terrarium for the Begonia darthvaderiana?
You can use a terrarium for the Begonia darthvaderiana plant. Most people prefer using a terrarium instead of a plant pot. It’s what you’re comfortable with when it comes to this special plant. But terrariums do make the process easier.
How can I get my Begonia darthvaderiana to bloom more often?
To get your Begonia darthvaderiana to bloom more, you need to make sure it’s getting plenty of indirect sunlight. The soil should always be moist but avoid saturation. You might want to cut back on fertilizing it. When it’s over-fertilized, it can stunt the growth and slow down the blooming cycle. This is from fertilizer burn.
Conclusion
The Begonia darthvaderiana plant is unique. You won’t find any other plant like this one. There aren’t even any Begonia species similar to this special one. It’s sad that it took so long for someone to discover this beauty.
Caring for one of these plants takes some consideration. But it’s not a difficult process and worth every minute of work. With a watchful eye and a bright spirit, you’ll have a blooming Begonia in your home.