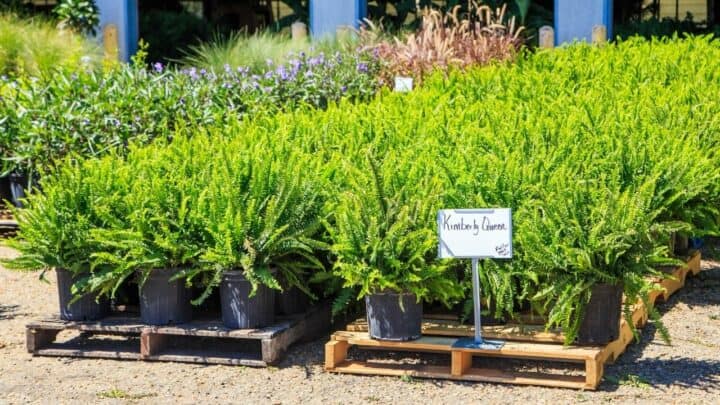

With large, graceful, sword-shaped fronds and elegant green color, the Kimberly Queen fern is a popular evergreen houseplant. Scientifically known as Nephrolepis obliterata, this plant is indigenous to Australia.
If you live in a warm climate, you can grow this plant outdoors all year or overwinter it indoors if temperatures fall too low at the colder time of the year.
I grow my Kimberly Queen fern in my bathroom as it thrives in the high humidity environment. As fern care is often a challenge I share my best care tips and tricks in this article with you.
[toc]
Kimberly Queen Fern Care
Kimberly Queen fern likes to grow in rich, moist, and well-draining soil. It prefers full to partial shade where it receives bright indirect light for at least 4-6 hours a day. Water it every time the top 2 inches of the soil are dry. Optimum temperatures and humidity are 65-75F° (18-24°C) and 70%.
Kimberly Queen Fern Care
Takeaways Kimberly Queen Fern Care
| Scientific Name | Nephrolepis obliterata |
| Common Name | Kimberly Queen Fern |
| Light | Bright indirect light |
| Watering | Water it every time the top 2 inches of the soil are dry |
| Soil | Rich, moist, and well-draining soil |
| Temperature | 65-75F° (18-24°C) |
| Humidity | 70% |
| Propagation | Plant division |
| Pot | Pot with drainage holes. Likes to be rootbound |
| Growth | Height: Up to 2-3 ft. in height, Width: Up to 2-4 ft. |
| Fertilizer | Fertilize monthly using a fertilizer at ½ or ¼ strength |
Kimberly Queen Fern Care Guide
Soil
Good soil drainage and water retention are the two most important soil traits a Kimberly Queen fern needs to thrive. This fern does not like to sit in soggy soil but will not look to grow in soil that dries out quickly. Adding ingredients such as peat, perlite, and organic compost will help.
Kimberly Queen ferns like to grow in rich, moist, and well-draining soil. As they grow on the forest floor in nature, the humus-rich and water-abundant location is perfect for this plant.
The soil needs to be well-draining. If this plant sits in excess water for too long, this can easily lead to root rot and cause your plant to die.
The other trait that this plant must possess is good water retention. Soils that do not retain water well tend to dry out very quickly, leaving the plant without moisture.
While this might be okay with drought-resistant plant species, ferns are heavy drinkers and always need ample soil moisture at all times to thrive.
If you’re using a regular houseplant potting mix, adding some peat to the soil will enhance soil drainage. Perlite can also be added to improve drainage.
And to improve water retention, use organic compost and add porous materials such as pot break pieces or crushed brick. These help store water inside them and slowly release it when the soil around them dries out.
If you have houseplant potting mix with you, here is a simple soil recipe you can use to create the perfect combination for your Kimberly Queen fern.
- ½ part regular potting mix
- ¼ part peat
- ¼ part organic compost
Light
The Kimberly Queen fern likes to grow in full to partial shade where it receives bright indirect light for at least 4-6 hours a day. It will not enjoy intense direct sunlight, but it will love mild morning sunlight. When growing indoors, place this plant in front of a north-facing window.
The Kimberly Queen fern is a fantastic houseplant because it can tolerate and even thrive in a range of different light levels available inside the home.
From partial sunlight to low light levels, this fern will grow in all kinds of light within this range. When growing outdoors, the perfect place for this plant is under the tree shade.
If you’re growing this plant indoors, you can hang it or place it in front of a north-facing window which will let through just the perfect amount of light your fern needs to thrive.
Regardless of whether you’re growing the Kimberly Queen fern indoors or out in your garden, you must protect it from harsh sun rays at all costs.
The plant’s foliage because dark and dull when exposed to excess light. When the sunlight becomes too intense, the leaves will suffer sunburn and turn brown and crispy.
Watering
The Kimberly Queen fern needs ample soil moisture to thrive. Its soil should never be allowed to dry out entirely, so keep checking the soil for moisture and water it every time the top 2 inches of the soil are dry. Make sure not to overwater this plant as it will quickly die in waterlogged soils.
To make sure you follow the best watering practices for your Kimberly Queen fern, you must also ensure you’re using the right type of soil to plant it.
The plant will still suffer if it doesn’t have well-draining and water-retaining soil even if you follow the best watering practice.
Using the right soil will also make things easier for you and keep your plant thriving even if you make a few watering mistakes.
The watering schedule for your Kimberly Queen fern depends entirely on your plant, pot size, soil type, and weather. So there is no set amount of times you can water your plant.
You can create your own watering schedule for your plant by frequently checking the soil for moisture and noting the number of times the plant needs to be watered per week in both summers and winters.
Moreover, using the right kind of water is also critical to your Kimberly Queen fern’s care. These plants do not like hard water.
If your tap water contains chlorine, fluorides, or a lot of salt, it is better to switch to clean filtered or drinking water for your ferns.
Temperature
The ideal growing temperatures for this plant are 65-75F° (18-24°C). Kimberly Queen ferns cannot tolerate temperatures below 55F° (13°C) and will need to be brought indoors or in a greenhouse in the winter. They are hardy to USDA zones 9-11.
Average indoor temperatures are just the perfect level for Kimberly Queen ferns. You will not have to make an extra effort to give these plants the right temperature when growing indoors.
Do not place this plant too near a glass window in the winter. Windows can be icy places during winter nights, and your plant will suffer in such a location.
In the same way, keep the plant away from any sources of heat or cold air and let them enjoy at a quiet and bright corner of your home.
Humidity
Like all ferns, Kimberly Queen ferns love humidity at 70% and higher. Such humidity levels are not present in our homes typically, and the leaf tips risk getting all shriveled up and crispy in dry environments. You can use a humidifier or pebble tray to make up for the required humidity levels.
Taking care of the atmospheric humidity available to your Kimberly Queen fern is a critical part of the plant’s care. Like all ferns, they require high humidity levels to thrive.
In the absence of adequate atmospheric moisture, the leaf tips will turn brown and crispy and will dim the overall look of your plant.
When growing this plant indoors, placing a humidifier can increase the humidity by at least 50-60% in the surrounding areas, which is just what your fern needs.
But the best way to meet the humidity requirements for this plant is to grow in your bathroom. Bathrooms have naturally high humidity levels because of the small space and frequently running water.
If your bathroom has sufficient natural lighting and temperature regulation, you can overwinter your fern in there!
Fertilizer
You can feed your Kimberly Queen fern monthly or fortnightly with an all-purpose liquid fertilizer diluted to ½ or ¼ strength. Be careful not to overfertilize your fern, as it can easily lead to brown and crispy edges. Fertilize the plant only during the growing season.
Ferns are not heavy feeders, so punctual fertilization is not a must. You can still feed your plant with a light dose every 30 or 40 days to ensure healthy and vibrant foliage.
Overfertilization and root tip burn are always dangerous with ferns so take special care when feeding your Kimberly Queen fern.
Always water your plant heartily before adding a mild dose of fertilizer. Also, do not fertilize this plant for at least 2 months after you’ve bought it.
You never know when was the last time the folks at the nursery fertilized the fern. You don’t want to give it a second feeding dose soon after being fed at the nursery.
Growth
The Kimberly Queen fern has large and beautiful fronds with erect and bushy leaves. It can grow up to 2-3 ft. in height and 2-4 ft. in width when mature. The fronds have a semi-arching shape. This is an evergreen plant and is a slow grower.
The fronds of this fern are large and sword-shaped and a sort of emerald-green in color. Generally, the plant has an upright and bushy growth pattern.
They are native to the Kimberly region in Australia and hence share the name. It also cleans the air of pollutants such as formaldehyde, making it an excellent plant to grow indoors.
The main stem in the fronds, also called petioles, is covered with very thin, reddish hair or scales. The leaves are slightly scalloped at the margins.
Although a slow grower, the growth speed is fastest in warm and humid weather.
Potting
When choosing the right pot for your Kimberly Queen fern, make sure the pot has drainage holes to avoid waterlogging. This plant can be grown in any pot but will look good in hanging baskets or other decoration pots. You will have to increase the pot size by one every growing season.
Excessively large pots are not recommended for potting ferns. The significantly large proportion of unused soil in large pots can retain excess moisture and lead to root rot.
Only use a pot slightly larger than the current rootball of your fern. Ferns do not mind being a little root-bound.
Line the bottom of the pot with a layer of small pebbles or rocks to ensure quick water drainage.
Pruning
These plants do not need to be regularly pruned. However, removing dead, damaged, or diseased foliage encourages new and healthy growth. It is a slow grower, and you will only need to prune the plant back to size after 2-3 years of unrestricted growth.
Although pruning is not a very important part of Kimberly Queen fern care, you must do it properly whenever you do.
Remove all dead and damaged foliage as all it does is suck precious energy from the plant. Always use a sterilized and sharp pruner when pruning your plants.
Kimberly Queen Fern Propagation
Ferns cannot be propagated through seed as they produce none. Plant division is the most practiced method of propagating this plant. Divide the root ball into two or 4 pieces and pot the individual clusters separately. The separated plants will soon get established in a warm and humid location.
Use the same potting mix for potting the separated clusters as you had used to plant your fern originally. Gently dab around the soil and shake the pots to eliminate air pockets.
Water the plants and keep the soil adequately moist at all times. Place in a warm and shaded location.
After potting, the separated clusters in new pots, covering them with a plastic bag is an excellent way to ensure successful propagation.
The plastic bag cover preserves moisture and warmth and mimics greenhouse conditions. This encourages rapid plant development, and the plants will get established quickly.
Common Problems with Kimberly Queen Fern
This fern does not have any particular disease or pest that it is susceptible to. Usual houseplant pests such as aphids, scales, spider mites, and mealybugs can infest the plant.
These can be efficiently dealt with using easy remedies such as Neem oil spray and more.
Dry Leaf Tips
Your Kimberly Queen fern leaf tips can easily get dried up and turn brown due to a range of reasons. These include harsh sunlight, a dry environment, high temperatures, root rot, overfertilization, and a few more.
Drying leaf tips is a quick indicator that something is not right, so keep an eye out for them.
Kimberly Queen Fern Care Conclusion
To care for a Kimberly Queen fern provide well-draining soil and bright indirect light. Water once the top 2-inches of soil are dry and provide temperatures between 65-75F° (18-24°C). The ideal humidity is around 70% but it will tolerate lower humidity. Fertilize sparingly about once a month using a fertilizer at ½ or ¼ strength.


Daniel has been a plant enthusiast for over 20 years. He owns hundreds of houseplants and prepares for the chili growing seasons yearly with great anticipation. His favorite plants are plant species in the Araceae family, such as Monstera, Philodendron, and Anthurium. He also loves gardening and is growing hot peppers, tomatoes, and many more vegetables.