
(image credits, IG:galohcenderakirana)
Some houseplants are revered for their gorgeous blooms. Others, however, are prominent for their vibrant foliage.
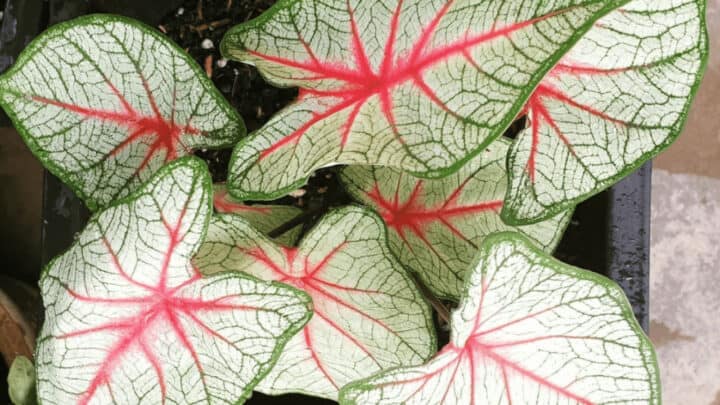
Such is the case of the White Queen Caladium, which boasts transparent-white leaves with pink veins and a green margin.
And the best part is, it rewards you with this stunning beauty all year long!
If you want to add some color to your home or garden, the White Queen Caladium is a perfect choice.
Here’s everything you need to know about caring for this houseplant.
[toc]
White Queen Caladium Care
The White Queen Caladium prefers to be kept in bright indirect light, and well-draining loamy soil with a pH between 6.0 to 6.5. Keep the soil slightly moist and water about once a week. In winter, cut back on watering to every 2-3 weeks. Maintain temperatures at 70-90 degrees Fahrenheit (21-32 °C) and above, and keep humidity between 50 – 70%. Feed every two weeks during spring and summer using a fertilizer with a 5-10-10 ratio.
White Queen Caladium Care Guide
Soil
The ideal potting mix for this plant is loamy well-drained soil. It should have a pH level between 6.0 to 6.5.
One thing I like to do when planting my White Queen Caladium is to add a 2-inch layer of pine bark mulch.
This compound really helps to improve aeration and drainage.
The drainage aspect is particularly handy as it ensures that the plant is not left sitting in soggy soil, which would otherwise lead to tuber rot.
Keep in mind that the root system and foliage will only grow well if the soil is well-aerated and slightly moist.
If you’re using regular soil, as opposed to a potting mix that’s tailored for caladiums, you should also consider adding a layer of organic material.
This ensures that the soil retains moisture long enough for the plant’s tubers to access it.
Light
If growing the White Queen Caladium indoors, place it in an area where it will be exposed to bright, indirect light for a couple of hours every day.
Light intensity is an integral factor to consider when choosing the spot to grow your White Queen Caladium.
Without optimal lighting, it won’t develop that beautiful coloration on its foliage.
Not only that, but insufficient light will also result in unwanted stretching of its petioles, overly large leaves, and an unsightly Caladium overall.
The type of light you provide depends on whether you’re growing it outdoors or indoors.
If it’s outdoors, place it in a partially-shaded spot so it can produce its vibrant color scheme.
You can, for instance, grow it under high-branched trees to offer it a bit of shade.
It can also grow under full-shade, but the coloration won’t be as pronounced as if it were being grown in partial shade.
Watering
Like other caladiums, the White Queen is susceptible to a condition called Pythium root rot.
This soil-borne disease has a significant impact on the plant’s continued growth, aesthetic appeal, and tuber yield.
The good news is that it’s easy to avoid by making sure that you don’t overwater.
To know whether your caladium really needs water, poke your finger (or a moisture meter) into the soil and assess the moisture levels.
Only water if the top two inches of soil feel slightly dry to touch as they like the soil to be slightly humid but never soggy.
Temperature
When it comes to temperature, the White Queen prefers the higher side of the spectrum.
To be specific, you should maintain the temperature at 70°F (21°C) and above.
The deal temperature range lies between 70-90 degrees Fahrenheit (21-32 °C).
Humidity
Humidity between 60% – 80% is best for your Caladium. Keep humidity at least at 50% and above.
As with temperature, this plant also likes a humid environment. So if the air in your home is really dry, consider supplementing using different techniques.
One tactic that I find to be particularly effective for Caladiums is the pebble tray.
Look for a saucer, and place pebbles on it. Next, fill it halfway with water, then place your potted White Queen on it.
As water evaporates from the tray, it will make the atmosphere around your plant moist; hence raising the humidity.
Alternatively, you can mist your plant to meet its high humidity requirements. Although this technique is also effective, it’s a little time-consuming as you’ll have to mist it several times per week.
Fertilizer
Overall, the White Queen Caladium is fairly easy to care for.
But, there are a few things you’ll need to do on your end to keep it happy and healthy. One of these activities is fertilizing.
Caladiums are heavy feeders, and the White Queen is no exception.
Here’s the thing, this plant needs a high amount of phosphorus and potash to produce healthy tubers.
This is particularly crucial if you wish to continue growing this plant in the next season.
Look for a fertilizer with a 5-10-10 ratio. It means that it’s made up of 5% nitrogen and 10% each of the phosphorus and potassium minerals.
If you’re growing your White Queen outdoors, apply a tablespoon of this fertilizer for every square foot of space.
But if you’re growing yours indoors, in a pot/container, you only need to apply a level teaspoon. As for frequency, reapply every four to six weeks during its growing season.
One question that a lot of homeowners ask, has to do with how the fertilizer is applied.
Ideally, you should apply this nutrient booster around the base of the plant, doing your best to avoid the foliage.
As pointed out later in the article, the White Queen has paper-thin leaves, making them more vulnerable to fertilizer burn if they were to come into contact.
For the same reason of preventing fertilizer burn, ensure you give your plant a good soak after the application.
Propagation
Propagating the White Queen Caladium primarily involves digging up the tubers, separating them than planting each one individually in a fresh potting mix.
Here is a detailed guide on how to propagate this succulent:
- Gently lift the plant’s tubers from the soil
- Using your fingers, brush off any excess dirt/soil that’s clinging on these tubers
- Inspect the tubers carefully. If there are any damaged or rotten buds, remove them before replanting. Similarly, dead or damaged foliage should be trimmed away using a pair of sharp garden scissors.
- Apply a tiny amount of your preferred fungicide on the tubers. Don’t skip this step as it helps to prevent the infected tubers from affecting the healthy ones.
- Prepare a fresh potting mixture in a different container; should be a substratum that is moist and fast-draining. You can prepare several pots, if you wish to have several of these plants on your garden or at home
- Plant the tubers in these pots at least 2 inches deep If planting in a garden, space the tubers so that they are 8- to 12-inches apart
- Pick a suitable planting location; should be lit brightly or have access to partial shade from the sun
- Water whenever the soil feels dry to touch. Finally, enjoy watching your plant flourish
Growth
As a non-flowering plant, the White Queen Caladium is taller than it is wide.
Expect it to grow 12 to 24 inches high with a spread of 10 to 12 inches (25-30cm).
Thanks to its fairly compact stature, this plant is very easy to grow in tight spaces.
Potting
There are a couple of instances that may force you to repot your White Queen Caladium.
One, if you notice that the container you purchased it in is too small.
Two, once the current pot becomes root-bound, which typically happens after 2 to 3 years.
With the second option, it’s best to repot in spring as this increases the chance of your plant surviving.
Sieh dir diesen Beitrag auf Instagram an
Common Problems with White Queen Caladium
Pests
For the most part, the White Queen Caladium is a care-free grower. However, there are a couple of critters that find it hard to resist that beautiful foliage.
Caterpillars are the most common culprits. These insects like eating leaves, starting from the exterior edges, moving to the middle section.
If you notice that a few of the leaves have rugged margins, it’s likely that your plant is infested by caterpillars.
Examine your White Queen closely to determine whether you’re dealing with just a few caterpillars or a full-blown infestation.
If there are just a couple of them, handpicking them is the safest and fastest solution. But if there are dozens of them, look for an effective pesticide, such as Bacillus thuringiensis.
Aphids can also attack your houseplant. Although they don’t pose as big a threat as caterpillars, they’re still harmful.
Usually, these cause damage by puncturing the leaves and stems, sucking sap, and discoloring its beautiful foliage.
While there are many chemical pesticides you can use to get rid of aphids, I’d recommend horticultural soap.
It’s the solution I always use on my caladiums, and it works perfectly. Simply, add it to a spray bottle, and mist it on the affected parts of your plant.
Another thing I like about horticultural soap is that it’s effective against a number of pests.
Apart from aphids, you can use it to get rid of spider mites, mealybugs, and whiteflies.
And the fact that insecticidal soap is non-toxic makes it safe to use around pets and toddlers.
Diseases
Dealing with pests isn’t the only problem you’re likely to encounter when caring for the White Queen Caladium.
Your plant may also suffer from diseases, the majority of which attack the tubers. Tubers are bulb-like structures, which serve as the foundation of your plant.
The number one problem that attacks caladium tubers is rot, and it’s usually caused by different fungal pathogens.
Examples of these pathogens include Sclerotium rolfsii (which hides in soil), Rhizoctonia and Pythium species.
In some cases, you may purchase a bulb that’s already infected with a fungal disease.
This disease can impede the proper growth and development of your caladium.
To tackle these fungal diseases, place your tubers in heated water.
The water should have attained a temperature of 122°F (50°C) so that it’s hot enough to kill all pathogens.
For the best outcome, leave your tubers in the heated water for at least 30 minutes.
Tips to Keep White Queen Caladium Problem-Free
- Keep your plant well-watered, especially during the growing season; but do not overwater
- Feed this caladium a light fertilizer to boost foliage growth
- If you’re growing this plant outdoors, you caThe Ultimate Guide to Growing White Queen Caladium
Some houseplants are revered for their gorgeous blooms. Others, however, are prominent for their vibrant foliage.
Such is the case of the White Queen Caladium, which boasts transparent-white leaves with pink veins and a green margin.
And the best part is, it rewards you with this stunning beauty all year long!
If you want to add some color to your home or garden, the White Queen Caladium is a perfect choice.
Here’s everything you need to know about caring for this plant.
White Queen Caladium Plant Profile
The White Queen Caladium is a stunner. There’s no doubt that it has one of the most distinct looks in the plant world.
This bulbous plant blends very thin, white leaves with green trim and hot pink centers.
As such, it’s sure to turn the heads of anyone who catches a glimpse of it. What I like the most is how these paper-thin leaves light up when they receive some sunshine.
Frequently Asked Questions about White Queen Caladium
What’s the best place to grow the White Queen Caladium?
It will thrive outdoors and in indoor settings. Just be sure to transfer it outdoors only when the temperatures are above 60 degrees Fahrenheit.
Why are the leaves on my White Queen Caladium drooping?
If your plant’s leaves are drooping, there are a few things that you could be doing wrong. These include Underwatering- without a constant supply of water, the leaves of a White Queen Caladium start wilting. If this problem is not rectified, the leaves will become dormant, and eventually drop. So always ensure that the soil is slightly moist; but then again, don’t overwater. Exposure to cold temperatures- this plant’s origin is from the tropical climate of Brazil, meaning it’s used to high temperatures. Ensure the temperatures don’t fall below 70°F (21°C) to prevent its leaves from wilting. Allowing fertilizer salts to accumulate- leaf droop could also be a sign of salt buildup in your plant’s potting mix. If the pot has drainage holes, add twice the amount of water that you usually use to wash away the excess salts.
Why are brown spots forming on my White Queen Caladium?
The most likely cause of this is sunburn. It occurs when you expose this plant to too much sun or when you transfer a Caladium that was growing in a greenhouse to a very sunny flower bed.
Conclusion
There’s a good reason why the White Queen Caladium is picked for the decor scheme of so many spaces.
That’s because it has one of the most phenomenal foliages. The heart-shaped leaves of this tuberous perennial are white with scarlet-rose veins emerging from the center.
As a bonus, it’s relatively easy to grow. So what are you waiting for? Get your hands on this plant and start enjoying its stunning beauty.


Daniel has been a plant enthusiast for over 20 years. He owns hundreds of houseplants and prepares for the chili growing seasons yearly with great anticipation. His favorite plants are plant species in the Araceae family, such as Monstera, Philodendron, and Anthurium. He also loves gardening and is growing hot peppers, tomatoes, and many more vegetables.