
You are reading this article to learn more about spider mites on houseplants and how to get rid of them.
We’re not trying to scare you. But spider mites aren’t mites. They’re not insects at all.
Instead, spider mites are arachnids, and they’re related to spiders. Hence, their name. And these creepy crawlers do as much damage as any houseplant bug.

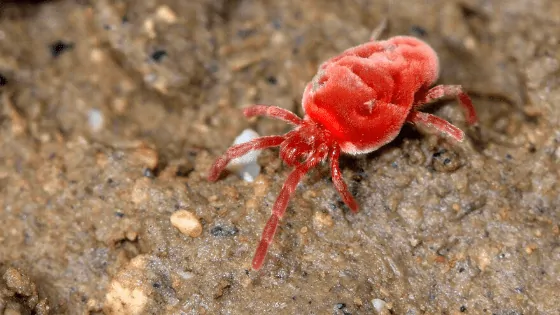
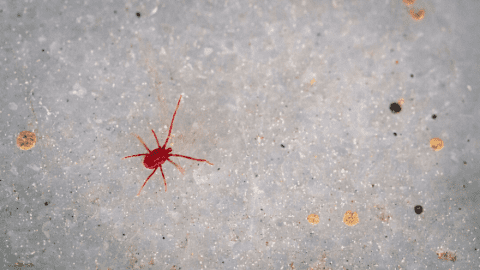
The best example is the red spider mite (tetranychus urticae).
They can be deadly pests for your beloved plants. And spotting the actual spider mites is almost impossible due to their micro size.
But if you believe you have these arachnids running around, you have a serious problem.
Like with most houseplant pests, a few spider mites aren’t going to have any real effect on your plant. But once they multiply, and they multiply fast, you’re in a world of trouble.

Not only does a large amount of spider mites harm your plant but getting rid of them is a conquest. When you treat your plant, you’re declaring war on these plant pests.
We’re not trying to stress you out. We’re only warning you that treatment is necessary, even for one small spider mite in your houseplant.
Don’t worry about having to jump from one web page to another for all the information you need.
We have all the details, from how spider mites reproduce to how to treat your plant for the pests. This is our ultimate guide to spider mites.
Table of Contents
What are Spider Mites?
As we stated earlier, spider mites aren’t bugs. They’re arachnids and they have several similarities to spiders.
They come from the Acari family Tetranychidae. This family has about 1,200 different species.


Some other spider mite species include:
- Red spider mites (tetranychus urticae)
- Spruce spider mites
- Southern red spider mites
- Strawberry spider mites
- Tumid spider mites
A spider mite’s body is broken down into two parts. The first part is the gnathosoma. This is the different parts of the spider mite’s mouth.
The second part is the idiosoma. The idiosoma includes the head, abdomen, and thorax.
Spider mites are oval and they have eight legs.
They’re less than one millimeter (or 0.04 inch) in length. They are super small pests. To us, they look like mere little black specks on your plant’s leaves.


Female spider mites are larger than male mites. They have 12 pairs of dorsal setae.
They come in a variety of colors but the most common is translucent spider mites. They also come in an orange-red or light green.
Most species have two dark spots on their bodies. These dark spots are an accumulation of their waste. Younger mites won’t have these spots yet.
Spider mites happen to be arthropods, which is why they’re so hard to treat when they infest a plant. This means the arachnids have external skeletons.
These pests love dry environments. They thrive in hot and dry climates. They also reproduce faster in dry heat.
Some of spider mite’s favorite plants include:
- Azaleas
- Camellias
- Cucumbers
- Eggplants
- Hollies
- Pyracanthas
- Roses
- Tomatoes
Spider mites love plants with high amounts of carbohydrates, nitrogen, and phosphorous.
How Spider Mites Reproduce
Spider mites can reproduce sexually and asexually. They live in colonies and feed in clusters.
The females lay up to 20 spherical transparent eggs a day. They will spin webbing around the eggs for protection from their natural predators.
Once the webbing is complete, the females attach the eggs to the web.
The hotter the area is the faster spider mites multiply. The eggs hatch within three days.
When the eggs hatch, larvae come out with only six legs. They don’t get the other two until they become adults.
Larvae are the first stage for spider mites.
They start feeding right away. They pierce different areas of your plant and suck out the sap.
The next two stages are nymphal. Last comes adulthood. The new spider mites become sexually mature anywhere between five and 20 days.
The entire process of becoming an adult can take anywhere from a week to two weeks.
Adult female spider mites live anywhere from two to four weeks. They drop eggs every single day and can lay hundreds in their lifetime.
Fertilized eggs create female spider mites while unfertilized eggs create male spider mites.
Any pesticide with carbaryl will boost the reproduction of the spider mites.
Always check the ingredients before you use any pesticides on an infested plant.
How Spider Mites Attack Your Plant
Spider mites use their mouths to suck the chlorophyll out of the leaves, according to the University of Maryland.
A spider mite destroys about ten to 20 cells during one minute of feeding.
Since they’re sucking so much life out of your plant and destroying so many cells, there’s going to be serious damage.
The sap (or chlorophyll) carries both nutrients and water to all your plant. Inside the sap are different components that do the hard work.
First, there are the xylem cells. Xylem cells carry water throughout the plant. The same water that the plant’s roots absorb.
The second component is the phloem sieve. The phloem carries the nutrients around the plant. These nutrients often come from the fertilizer you put in your plant’s soil.
With a few spider mites feeding on your plant, it’s going to feel it.
Now imagine what happens when there are hundreds and hundreds of these mites feeding.
Those small symptoms before become bigger and bigger. Until your plant can’t take any more.
How to Prevent Spider Mites
You shouldn’t have to worry about spider mites.
If you’re looking to prevent the arachnids, there are techniques out there that have proven to be helpful.
Before you bring a plant into your home, check it for all houseplant pests.
If you bring it into your home and you have other plants, you’re exposing them to the pests as well.
You should quarantine any plant with spider mites or any other pest until you’ve treated them.
Another prevention tip is to clean your plant two to three times a week. Dusty leaves attract spider mites.
You can clean your plant in two ways.


The first way to clean your plant is to use a high-pressure hose if it is tough enough to take it.
The second way to clean your plant is to stick it in a shower if you have one.
When you clean your plant, don’t forget to water down every part of your plant. Pay particular attention to underneath the leaves.
Always make sure your plant is well-hydrated. A plant that doesn’t have enough water becomes stressed.
A stressed plant is more vulnerable to spider mite infestations.
Since these mites love dry climates so much, it’s important to create humidity. It’s also important to keep your plants away from too much dry heat.
So, keep your plants away from heating vents and make sure the temperature in the room isn’t too high.
To create humidity, you only need a tray, pebbles, and water.
Fill the tray all the way up with the pebbles. Pour water in the tray. Fill it up until the water’s just under the pebbles. Set your plant on the tray.
The water will evaporate causing condensation on your plant. The evaporation also creates humidity in the air.
The only upkeep you have to do is to refill the tray with water once it runs out.
How to Get Rid of Spider Mites
Detecting Spider Mites
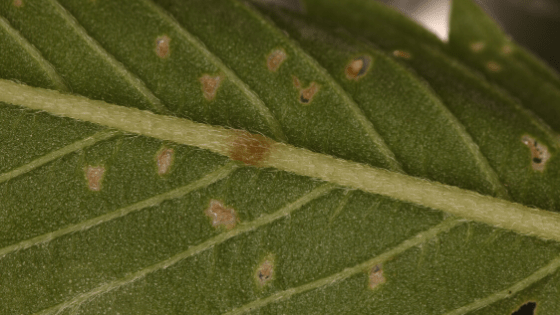
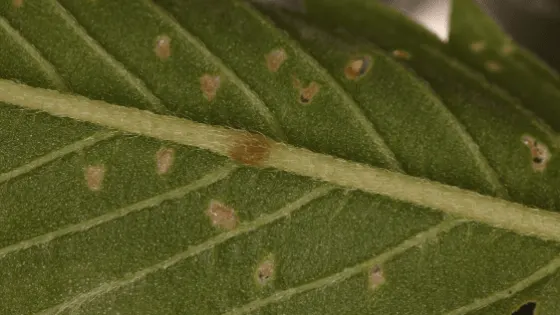
As the leaves lose chlorophyll from spider mites, there are several signs.
The most obvious signs of the mites are white spots scattered on the leaves or brown or yellow specks. These are necrotic spots.
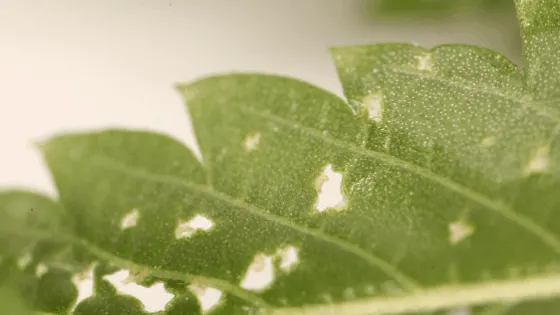
The leaves will also form small holes. The small holes are where the arachnids have fed for too long.
The more spider mites, the worse off your plant will be. After a while, the leaves will turn all yellow or even gray.
So many spider mites feeding on the leaves will lead to the leaves’ death. Once they’re dead, they start dropping off the plant.
The leaves may even look dusty. But this isn’t dust, it’s teeny tiny spider mites crawling all over them.
Check under the leaves of your plant. This is where they hide and feed.
Any open flowers will brown and the petals will drop off.

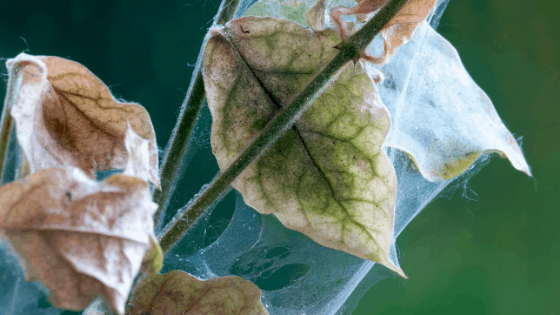
Different species of spider mites leave a trail of silk webbing over both leaves and the stem.
They create the webbing as a form of protection for them and their eggs.
Spider mites feeding can also lead to very slow growth or even stunt the growth altogether.
This can be hard to detect in plants that are slow growers anyway.
If you’re still not sure, grab a white piece of paper. Hold it under the plant while you shake the plant with your other hand. You’ll catch the spider mites as they fall.
It makes examining them much easier since they’re so hard to see. You’ll see the paper covered in small black specks.
Grab a strong magnifying glass and check these critters out.
Small Spider Mite Infestations
As soon as you find a spider mite infestation on your plant, you need to get to work. It’s better to get rid of them now than after the infestation has tripled.
Spider mites aren’t the easiest houseplant pests to get rid of.
An easy way to eliminate a very small infestation is to blast your plant with a heavy stream of water. This sends these critters and their eggs flying off your plant.
Only use this method if you think your plant is tough enough to take a strong stream of water.
You can use a hose to do this. Make sure you get every inch of the plant, including underneath the leaves.
Spray down the plant a few days later in case there were any spider mites still clinging on.
If you don’t think your plant can handle a strong stream of water, consider wiping down your plant instead.
All you need is a bucket full of lukewarm water and a sponge.
Before the infestation spreads, prune the leaves and branches that have spider mites. Make sure you use pruning shears and not scissors.
Have a garbage bag handy so you can fill it up with your trimmings. Take the bag outside to your garbage can right away.
Neem oil is very effective against small spider mite infestations. Neem oil is extracted from neem trees.
It’s important to mix neem oil with water before you use it on your plant. Despite neem oil being all-natural, it can hurt your plant if it’s not diluted.
Test an area of your plant to make sure your plant doesn’t have a bad reaction. The oil works well with most plants, as long as it’s diluted.
But you never know how a plant’s going to react.
Spray the entire plant, including under the leaves. Your plant should soak in the heavy oil.
The neem oil should suffocate both the spider mites and their eggs.
You’ll have to repeat this process twice a week for about a month. This ensures you’ve gotten rid of the whole spider mite infestation.
The last method for small spider mite infestations is to use their natural enemies. You can buy different types of predatory bugs, including ladybugs.
Or you can always catch a few ladybugs too if that’s a plausible choice for you.
Ladybugs are a natural enemy of spider mites. They eat both spider mites and their eggs.
All you need to do is release them onto your plant. Keep a nice and healthy plant so your ladybugs don’t wander off too far.
Large Spider Mite Infestations

Large spider mite infestations can be terrifying. But it doesn’t have to be if you follow our advice. You’ll be rid of these mites with a little hard work.
Don’t be fooled by the name, insecticidal soap works as well with spider mites as it does with any insect.
Insecticidal soap is a great way to treat your plant for the mites and it won’t harm your plant. It doesn’t even leave a residue after applied.
Like in most soaps, this soap is full of fatty acids. Fatty acids disrupt the cell membranes.
The disruption causes the protective coating on the spider mites to dissolve. The spider mites will dehydrate and die as a result.
We have the perfect insecticidal soap recipe to rid your plant of spider mites. This special recipe will make a 2% insecticidal soap.
You’ll need:
- 1 tablespoon pure liquid soap (you can substitute it with mild liquid dish soap)
- 2 tablespoons of olive oil
- 1 quart of water
- Spray bottle
In a clean empty spray bottle, add the pure liquid soap, olive oil, and water. Shake and mix until the soap is ready.
Before you apply insecticidal soap, there are a few precautions to take.
Test a small area of your plant with insecticidal soap. Let it sit for an entire day.
If there’s any damage, you should either dilute it or find another method to try.
When a plant doesn’t react well with the soap, you’ll see burn marks or similar marks.
Some plants that don’t do well with insecticidal soap at all.
These plants include:
- Azaleas
- Ferns
- Lantana
- Succulents
When you go to apply the insecticidal soap, spray your whole plant. Don’t forget to spray under the leaves where most spider mites hang out.
You don’t want to miss an inch.
You have to repeat this process to get every spider mite on your plant. Repeat once a week for about three weeks. But if you need to, you can apply the treatment for longer.
Another method to kill spider mites involves essential oils outside of only neem oil. These oils are strong enough to handle large infestations. And essential oils won’t damage your plant.
We have a great recipe that anyone can make at home.
You’ll need:
- 2 tablespoons of rosemary oil
- 1 teaspoon of peppermint oil (or eucalyptus oil)
- 1 quart of water
- Spray bottle
Peppermint oil discourages the spider mites from coming back to your plant. They hate the smell of peppermint as well as eucalyptus.
Rosemary oil kills spider mites on contact. The oil suffocates the mites.
Make sure you test an area of your plant before using the essential oil mix. Check that area the next day to see how it reacted.
The essential oil mix is easy to make. Fill the spray bottle with rosemary oil, peppermint oil, and water. Shake or mix it up well.
Spray your plant with the special oil mix. As we’ve pointed out, don’t forget to spray under the plant’s leaves.
You’ll smell that strong stench of peppermint right away.
You have to repeat this method. The best way to go about it is to apply the special mix twice a week for about a month.
Once that month is over, make sure there are no more spider mites. You can hold a white piece of paper under the plant as you shake it.
If there are still spider mites, you’re going to have to start the process over again.
Try to avoid using chemical pesticides. Spider mites become resistant to these types of pesticides quickly.
FAQ
How do spider mites get inside to infest indoor plants?
It’s easy for spider mites to find their way inside your home. These pests are so small, they can ride on you without you ever knowing. You can go out to your backyard and pick up the mites.
When should I apply neem oil to my plant to eliminate spider mites?
The best time to apply neem oil as a pesticide is early morning or at night when it’s cooler. This allows the oil to stick to the plant for longer. Never apply the neem oil when the temperature is over 90F (32C).
Where can I buy predatory bugs to eliminate my spider mite infestation?
You can buy predatory bugs, including ladybugs, online. You can also buy them at any large grow or gardening store.
Conclusion
Spider mites are spine-chilling creatures if you can even see them. Most of the time, you’ll be oblivious until your plant starts to show symptoms.
You don’t need to freak out when you see eight legs and two red eyes peering back at you through your magnifying glass.
Other plant pests are Mealybugs, Thrips, Aphids. Have a look at our other articles.
I hope this article helped you to identify and get rid of the spider mites on your plants!