
(image credit, IG:galohcenderakirana)
Spring’s around the corner and we have for you just the plant to celebrate the growing season.
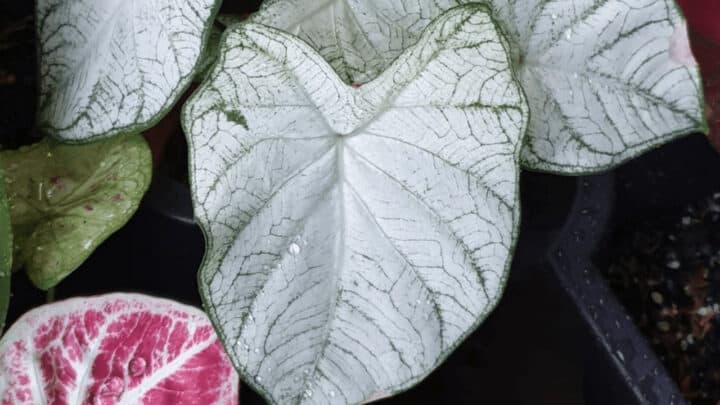
The Moonlight Caladium is a show stopper from the “elephant ear” group of plants (along with Alocasia, Colocasia, etc.) belonging to the Araceae family.
People grow Moonlight Caladium for the other-worldly, translucent white-colored, heart-shaped foliage.
The leaves are light and papery and have light green veins on them. The plant has an attractive mound-like growth habit and reaches a moderate size making it suitable for indoor growing. But is it a great species for mass planting as well.
You can grow Moonlight Caladium from bulbs. The plant has no stems, so the leaves emerge straight from the bulbs on fleshy but erect petioles.
Irrespective of which part of the world you grow Moonlight Caladiums, they behave like annuals.
The plant bulbs go dormant periodically and the leaves die out. But they grow back if the bulbs are saved for the next growing season.
Moonlight Caladiums care isn’t that easy. So please go through the care guide carefully if you wish to grow them successfully.
Table of Contents
Moonlight Caladium Care
The primary care requirement when you grow Moonlight Caladium is soil temperature. It needs to be a minimum of 70°F (20°C) before you start the plant and stay consistently above this for the entire growing season. The second vital element is moisture and humidity both of which are needed in relatively high measures. They need loose, well-draining soil rich in organic content with regular potash and phosphorous-rich fertilizations throughout the summer months.


Moonlight Caladium Care Guide
Soil
The main thing to note with respect to Moonlight Caladium care is that soil should have moisture retentiveness.
You can grow Moonlight Caladium in a peat-based soil mixed enriched with leaf mulch and compost. Further soil nutrition can be provided by using slow-release organic soil additives like dung manure.
They prefer a soil acidity level in the range of pH 6.0 to 6.5 i.e. slightly acidic. But acidity levels change over time so don’t go crazy over it.
The mulch, moss, compost, and other organic amendments will lend acidity to the soil.
Before planting the bulbs make sure you fortify the soil with a balanced fertilizer too because Caladiums are very heavy feeders. Bone meal is a good soil additive.
If your soil is heavy or clayey that becomes waterlogged, it is wholly unsuitable for Moonlight Caladium care. You can turn your soil into a light free-draining potting mix by using sand, perlite, or vermiculite.
I’ve observed that Moonlight Caladiums like the soil to be soft and porous rather than rough and coarse. If you have soil with a lot of earthworm action that’s the exact kind of soil they like.
Light
If you want to grow Moonlight Caladium you should know this is a light loving plant that gets scorched in direct sunlight. In the natural habitat, they grow by the banks of rivers where the tree cover is thinner. But they will still hide in shade.
Proper Moonlight Caladium care would mean ensuring that they get that “bright shade” light level. If you’re growing them outdoors, then the ideal spot would be under a tree.
The dappled shade of the tree will be perfect for the plant.
They will tolerate full shade as long as it’s warm to hot. But the colors will go dull.
If you grow Moonlight Caladium indoors then choose a spot 3 to 4 feet away from a well-lit window.
If you want to place them on an east or west window sill, then place them behind sheer drapes to avoid leaf burn.
Watering
Moonlight Caladium care requires even and consistent moisture. We are often told to dry out the soil a bit before watering again. That doesn’t work in the case of Moonlight caladiums.
In their growth phase when they are rapidly shooting out new leaves, they need that regular watering. Otherwise, the petioles will droop and the root bulbs won’t develop as needed.
They just don’t like their root bulbs to be soggy wet but they like the soil to be moist all the time. So if you plant it under a tree where all the excess water of the garden collects in a puddle, your plant is not going to survive.
The only time they like it drier is when the plant hits its annual “time off” i.e. dormancy. Once the leaves start dying back at the end of the growing season you can cut back on watering.
Temperature
Moonlight Caladiums really flourish in hardy climatic zones closer to the tropics where you can grow them outdoors all year round through dormancy.
If you want to grow Moonlight Caladiums successfully make sure that the soil temperature is consistently above 70°F (20°C) because that’s when the bulbs get into active growth.
They are a lot like Ladies Finger “Okra” in this sense. In fact, a lot of gardeners plant the two at the same time of the year.
(Note that Okra needs full sun, whereas Moonlight Caladium is a shade plant.)
Moonlight Caladium can take warmer temperatures. But the plant has no frost tolerance whatsoever and the bulbs will be destroyed at the first sign of frost. The bare minimum they need is 65°F (18°C).
Once temperatures fall every year the plant will automatically wilt and disintegrate for winter dormancy.
Humidity
It is difficult to think of a tropical more humidity-loving than Moonlight Caladiums. They are in fact a lot like ferns in their moisture needs. Due to its clump-forming behavior, the plant is well adapted to manage its own humidity needs to a great extent.
But when grown indoors in dry air-conditioned rooms they tend to have dull growth.
Some humidity-enhancing Moonlight Caladiums care hacks include pebble trays, humidifiers, and regular fine-misting.
If you grow them outdoors the huddling up plants and mulching the soil heavily will help.
Combine that with occasional misting. But mist only in the mornings the leaves don’t stay wet overnight inviting infections.
Here’s a Moonlight Caladiums care tip, try growing them in your bathroom. The warm muggy air in there is perfect for these plants and they add a bit of jazz to the décor too!
Fertilizer
Caladiums are heavy feeders. They need potash and phosphorus and must have sufficient fertilization combined with moisture in order to produce a lot of new bulbs for the next growing season.
The ideal method is to get a soil test done and accordingly supplement the soil with appropriate NPK levels. This is feasible when you mass plant Moonlight Caladiums in garden landscaping projects.
For home gardening, soil testing may be too much fuss. Therefore, before planting the bulbs enrich the soil with a balanced fertilizer like an 8-8-8.
Bone meal is also a good choice of feed for when you prepare the starting soil for these plants.
After the plants sprout just feed them potassium and phosphorus-rich fertilizer every 2 weeks making sure it’s diluted to a third of its recommended strength.
A 5-10-10 fertilizer is good. High nitrogen in the soil can result in the leaves going green rather than the translucent white that we love.
Water the plant thoroughly after fertilization.
Propagation
When you buy a Moonlight Caladium from a nursery you get them as potted plants or dormant tubers or bulbs. From that, you should know that these plants propagate through the production of new bulbs.
Each bulb has a leaf bud through which the new plant emerges. The larger bulb clusters have more leaf buds and make a bushier display of heart-shaped leaves.
Every bulb cluster has a big central bulb and several pups around it. De-eyeing the central bulb will stimulate better growth in all the surrounding smaller ones.
Growth
Moonlight Caladium plants grow to about 24 inches (60 centimeters) tall at maturity, with an equal spread. That is what is so pleasing about this plant. The mounds are perfectly well-proportioned hemispheres with medium-sized leaves.
Moonlight Caladiums aren’t annuals, it’s just that they have resting or a dormancy period when growth slows down and leaves die back.
However, in non-tropical weather conditions where winter months are cold, this plant can be treated like an annual, saving the bulbs before the frost hits the soil.
Although a lot of home gardeners don’t have outdoor spaces for their plants, I would still point out that this plant is great for summer landscaping and mass planting particularly if you have shaded patches to cover.
For the rest of us living in apartments, potting is the solution.
Potting
For a single cluster of Moonlight Caladiums, a 6-inch or 8-inch pot would do. Even though the leaves fan out laterally, the root structures are small and the plant is not top-heavy.
Any pot type is OK as long as it has proper drain holes.
Once the plant reaches dormancy you can simply let the bulbs remain in the soil and cut back on watering and feeding. Keep the pot somewhere cool and dry.
Step By Step Guide On Moonlight Caladium Propagation
Moonlight Caladium Bulbs
The first step is getting to choose the right bulbs and prepare them for planting. If you want to grow Moonlight Caladium into a bushy mound you must start with a big-sized cluster of bulbs. The more the buds the more the leaves, obviously.
The next step is not that obvious. Every cluster of bulbs has a big central bulb and several small ones surrounding it that you probably can’t even see.
The central bulb takes up all the nutrition and doesn’t let the small ones sprout.
At the start of the growing season, you need to de-eye the bulb clusters. Feel the surface of the bulb for the eye or the bud from where the leaves sprout.
With a sharp and sterile knife tip carefully scoop off the bud.
It feels cruel but doesn’t worry about it. It’s the same as pinching tips to induce branching.
When the visible eyes on the big bulbs are removed a bunch of tiny bulbs spring into action after planting.
The result is a bushy mound of Moonlight Caladium. Rest the bulbs for 2 to 3 days in a dry place until the cuts callus to reduce the risk of tuber rot.
Planting the bulbs
You have to wait until the soil temperature is consistently above 68°F (20°C). You should have all summer ahead of you when you start.
- Prepare sterile coco peat by soaking it for 15-20 minutes in boiling hot water.
- 50% peat and 50% perlite or sand is a good starting medium
- Fill a 4-inch pot with this mix. Remember it needs to be warm and moist.
- Add 1 teaspoon of bone meal to the topsoil mixing it with the top two inches
- Place the bulb 2 inches under the soil with the eye-side up, i.e. the indentation should face up. This is important otherwise the plant takes much longer to sprout
- Cover the pot with transparent zip-lock bags to trap moisture.
- Set them aside in bright shade making sure the potting mix stays moist always
- Within two to four weeks the bulbs should start sprouting
Digging and storage of Moonlight Caladium bulbs
- When the temperature starts dipping below 65°F (18°C) during late autumn it’s time to dig out the moonlight caladium tubers. They are pretty easy to unearth since they are just 1 to 2 inches under the soil.
- With a garden spade dig inches away from the base of the plant so avoid damaging the bulbs
- Dust the soil off the bulbs with a brush, cut away any remaining leaves and trim off the roots. Don’t wash the bulbs to reduce the risk of tuber rot.
- Lay the bulbs out on a table for 3 to 4 weeks until they are quite dry. During this time the temperature has to be above 65°F (18°C), so indoors is the best location
- Store them in a paper box with holes or a crate so that there’s good ventilation. For better protection, you can place the bulbs in layers of shredded paper or wrap them individually in paper towels
- Label the box if you’re dealing with more than one variety of bulbs
Sieh dir diesen Beitrag auf Instagram an
Common Problems with Moonlight Caladiums
Tuber rot
Tubers or bulbs may decay in storage or during the growing season due to bacteria or fungal infection. Never wash the bulbs before storage. Store them in a dry place in paper. Don’t plant the bulbs until the soil moisture is adequate.
Leaf spot
You may find brown spots on the lower leaves caused due to fungal infection. This disease is generally not severe enough to warrant any control measures. Just cutting away affected leaves and keeping the leaf surface dry should be enough.
Leaf burn
There could be two reasons for this. Sun exposure and NPK fertilizer concentrate falling on the leaves. Sun exposure is easy to deal with. Just move the plant to a shadier place and hydrate well.
When you fertilize, the concentration is thinned down and the application is only to the base of the plant. Finally, water deeply for a couple of days.
Tips to Keep Moonlight Caladium Problem-free
- Give it soft well-draining soil rich in peat, leaf mulch, and compost
- Mix bone meal in the soil
- Soil cannot be heavy, clayey, or waterlogged
- Water regularly during growing months keeping the soil moist
- Soil temperature should be above 70°F (20°C) throughout the growth face
- Apply a potassium and phosphorus-rich fertilizer every 2 weeks
- De-eye the bulbs before planting for a bushy growth
- Store the bulbs taking great care to keep them dry in minimum temperatures of 65°F (18°C)
Frequently Asked Questions About Moonlight Caladium
Are Moonlight Caladiums sun tolerant?
Unlike popular belief that Moonlight Caladiums are shade plants, I’ve seen great growth and vibrant leaf coloring with some sun exposure. I would describe them as fairly sun-tolerant plants. But avoid direct afternoon sun exposure. Dappled sunlight is great for them.
How do Moonlight Caladiums multiply?
If the soil is very rich and you provide adequate fertilization in a timely manner. With plenty of potash and phosphorus in the soil, the bulbs will quickly multiply into several bulbs.
Conclusion
Moonlight Caladiums are exotic plants and quite high maintenance with highly nuanced care requirements. It gives the best aesthetic results when mass-planted in an outdoor location. Under such circumstances, their sun tolerance and humidity retention also improve.
If you are into exotic plants I’d recommend that you go through Macodes Petola and Epiphyllum Hookeri.
I wouldn’t advise growing this plant for first-time gardeners who just want to green up their rooms.
We have care guides put together for a wide range of plants and care needs. Hope you find what you need amongst them.
Happy Indoor Gardening!


Daniel has been a plant enthusiast for over 20 years. He owns hundreds of houseplants and prepares for the chili growing seasons yearly with great anticipation. His favorite plants are plant species in the Araceae family, such as Monstera, Philodendron, and Anthurium. He also loves gardening and is growing hot peppers, tomatoes, and many more vegetables.